It happens that NordVPN openvpn configuration files don't work anymore after a while.
I made a bash script to update the configuration easy and fast:
#!/bin/bash
# Mise a jour de la configuration NordVPN
# Dossier temporaire
DOSSIER_TEMP="/home/pi/NordVPNautoUpdate"
#Dossier des configurations openvpn
DOSSIER_OPENVPN="/etc/openvpn"
CONF_OPENVPN="server.conf"
AUTOLOGIN_OPENVPN="login.txt"
# Pays
PAYS="ua"
# TCP ou UDP?
PROTO="udp"
# Archive de configuration NordVPN
ARCHIVE_NORDVPN="https://downloads.nordcdn.com/configs/archives/servers/ovpn.zip"
FICHIER=$(echo -n $ARCHIVE_NORDVPN | awk -F "/" '{printf $NF}')
# On supprime et on crée le dossier temp
rm -rf $DOSSIER_TEMP
mkdir $DOSSIER_TEMP
# On télécharge tous les fichiers de conf NordVPN
wget $ARCHIVE_NORDVPN -P $DOSSIER_TEMP
# On dézip l'archive téléchargée
mkdir $DOSSIER_TEMP/temp
unzip -q "$DOSSIER_TEMP/$FICHIER" -d $DOSSIER_TEMP/temp
# On garde que les conf d'un certain pays
mv $DOSSIER_TEMP/temp/ovpn_$PROTO/$PAYS[0-9]*$PROTO* $DOSSIER_TEMP/
rm -r $DOSSIER_TEMP/temp
# On supprime les conf double-VPN et l'archive zip
NbConf=0
for ConfOpenVPN in $DOSSIER_TEMP/*; do
if [[ $ConfOpenVPN != */$PAYS[0-9]*$PROTO* ]]; then
rm $ConfOpenVPN
else
# On compte le nombre de conf restantes
NbConf=$((NbConf+1))
fi
done
# On choisi une conf au hasard
NbConf=$((1 + RANDOM % $NbConf))
COMPTEUR=0
for ConfOpenVPN in $DOSSIER_TEMP/*; do
COMPTEUR=$((COMPTEUR+1))
if [[ $COMPTEUR -eq $NbConf ]]; then
# On modifie la configuration pour authentification automatique
sed -i "s@auth-user-pass@auth-user-pass $DOSSIER_OPENVPN/$AUTOLOGIN_OPENVPN@" $ConfOpenVPN
# On déplace la conf dans le dossier openvpn
sudo cp -f $ConfOpenVPN $DOSSIER_OPENVPN
sudo cp -f $ConfOpenVPN $DOSSIER_OPENVPN/$CONF_OPENVPN
# On informe
echo "Configuration installée :"
echo $ConfOpenVPN | awk -F "/" '{printf $NF}'
echo ""
fi
done
# On supprime le dossier temporaire
rm -rf $DOSSIER_TEMP
# On redémarre openvpn avec la nouvelle configuration
sudo service openvpn restart
Then simply execute the script:
bash NordVPNautoUpdate.sh
If your airsonic is stucked for some reasons such as Liquibase Update Failed and Waiting for changelog lock...
liquibase.exception.LockException: Could not acquire change log lock. Currently locked by 192.168.254.200 (192.168.254.200) since 18/11/18 16:39
- Stop Airsonic for sure :
sudo service airsonic stop
- Read logs
/var/airsonic/airsonic.log :
nano /var/airsonic/airsonic.log
- Backup your database folder
/var/airsonic/db :
sudo cp /var/airsonic/db /var/airsonic/db_backup
- Edit
/var/airsonic/db/airsonic.script :
sudo nano /var/airsonic/db/airsonic.script
- remove all lines where you can find DATABASECHANGELOGLOCK by example :
- CREATE MEMORY TABLE DATABASECHANGELOGLOCK.....
- INSERT INTO DATABASECHANGELOGLOCK VALUES(1,TRUE,'2018-11-18 16:39:56.266000000','192.168.254.200 (192.168.254.200)')
- Save file.
- Start Airsonic :
sudo service airsonic start
- Check Airsonic status :
sudo service airsonic status
If you wanna reset your Airsonic music server, just delete the database /var/airsonic/db ...
Source 1, 2, 3.
How to update a standalone Airsonic
- Stop the current running Airsonic:
$ sudo systemctl stop airsonic.service
$ cd /var/airsonic/
$ sudo mv airsonic.war airsonic.war.10.1.1.bak
$ sudo wget https://github.com/airsonic/airsonic/releases/download/v10.1.2/airsonic.war --output-document=/var/airsonic/airsonic.war
- Put good rights to all folder (new airsonic.war is not owned by airsonic), and verify it has been applied:
$ sudo chown -R airsonic:airsonic /var/airsonic
$ ls
total 151M
-rw-r--r-- 1 airsonic airsonic 760K Oct 11 19:52 airsonic.log
-rw-r--r-- 1 airsonic airsonic 11M Oct 3 00:20 airsonic.log.1
-rw-r--r-- 1 airsonic airsonic 978 Oct 11 04:00 airsonic.properties
-rw-r--r-- 1 airsonic airsonic 70M Jul 28 22:10 airsonic.war
-rw-r--r-- 1 airsonic airsonic 70M Dec 16 2017 airsonic.war.10.1.1.bak
drwxr-xr-x 2 airsonic airsonic 4.0K Oct 11 19:49 db
drwxr-xr-x 2 airsonic airsonic 20K Sep 14 16:08 lastfmcache
drwxr-xr-x 7 airsonic airsonic 4.0K Jul 22 10:36 lucene2
-rw-r--r-- 1 airsonic airsonic 741 Oct 11 19:50 rollback.sql
drwxr-xr-x 16 airsonic airsonic 4.0K Oct 4 17:45 thumbs
drwxr-xr-x 2 airsonic airsonic 4.0K Jul 22 10:54 transcode
- Start updated Airsonic and restart proxy server:
$ sudo systemctl start airsonic.service
$ sudo service nginx restart
Nothing too hard, basically, you need to replace the airsonic.war by the updated one.
PluXml 5.6 / CKEditor 4.7.3 modification to get handy code <div>
I modified the file /plugins/ckeditor/ckeditor/styles.js to have a much more easier way to put code in my memo.
Before:
{
name: 'Special Container',
element: 'div',
styles: {
padding: '5px 10px',
background: '#eee',
border: '1px solid #ccc'
}
},
After:
{
name: 'Special Container',
element: 'div',
styles: {
padding: '5px 10px',
background: '#eee',
border: '1px solid #ccc',
'white-space': 'nowrap',
'overflow': 'auto',
'font-family': 'monospace, monospace',
'font-size': '0.9rem'
}
},
Modification to get better visual when using <kbd>
In PluxXML Administration > Parameters > Themes > Edit Theme files > /css/plucss.css I have set this for <kbd> HTML tag.
kbd {
background-color: #eee;
border-radius: 3px;
border: 1px solid #b4b4b4;
box-shadow: 0 1px 1px rgba(0, 0, 0, .2), 0 2px 0 0 rgba(255, 255, 255, .7) inset;
color: #333;
display: inline-block;
font-size: .85em;
font-weight: 700;
line-height: 1;
padding: 2px 4px;
white-space: nowrap;
}
- Before : CTRL + ALT + DEL
- After : CTRL + ALT + DEL
CSS source
Original post
I am loosing connection to my Raspberry Pi 3 in a very much random way.
I recently replaced Subsonic by Airsonic, and connection to Pi seemed to be much more stable since that exact day. But today, it happened one more time... as I was expecting! Time to troubleshoot has come.
Since I am using 2 tables to root my traffic, one of them is not updated on some interface up/down events. I made a small script called by cron every 5 minutes to understand things and rebooting Pi once a day to get the access back:
#!/usr/bin/env bash
# Script to monitor and restart wireless access point when needed
# Logging
date >> NetworkCheckLog
echo "wap_check_pmd: Checking if network connection is down..." >> NetworkCheckLog
echo "$ ip route show table main" >> NetworkCheckLog
ip route show table main >> NetworkCheckLog
echo "$ ip route show table 42" >> NetworkCheckLog
ip route show table 42 >> NetworkCheckLog
# First make sure we can resolve google, otherwise 'ping -w' would hang
if ! $(host -W5 www.google.com > /dev/null 2>&1); then
#Make a note in syslog
logger "wap_check_pmd: Network connection is down..."
date >> NetworkCheckLog
ifconfig >> NetworkCheckLog
echo "wap_check_pmd: Network connection is down..." >> NetworkCheckLog
exit
fi
Time when it got fucked:
Mon 6 Aug 08:55:01 CEST 2018
wap_check_pmd: Checking if network connection is down...
$ ip route show table main
0.0.0.0/1 via 10.8.7.1 dev tun0
default via 192.168.1.1 dev wlan0 src 192.168.1.200 metric 303
10.8.8.0/24 dev tun0 proto kernel scope link src 10.8.7.12
31.192.112.170 via 192.168.1.1 dev wlan0
128.0.0.0/1 via 10.8.7.1 dev tun0
192.168.1.0/24 dev wlan0 proto kernel scope link src 192.168.1.200 metric 303
$ ip route show table 42
default via 192.168.1.1 dev wlan0 src 192.168.1.200 metric 303
192.168.1.0/24 dev wlan0 proto kernel scope link src 192.168.1.200 metric 303
Mon 6 Aug 09:00:01 CEST 2018
wap_check_pmd: Checking if network connection is down...
$ ip route show table main
0.0.0.0/1 via 10.8.7.1 dev tun0
default via 192.168.1.1 dev wlan0 src 192.168.1.200 metric 303
10.8.8.0/24 dev tun0 proto kernel scope link src 10.8.7.12
128.0.0.0/1 via 10.8.7.1 dev tun0
192.168.1.0/24 dev wlan0 proto kernel scope link src 192.168.1.200 metric 303
$ ip route show table 42
Mon 6 Aug 09:00:15 CEST 2018
wap_check_pmd: Network connection is down...
I then checked /var/log/syslog:
Aug 6 08:59:26 raspberrypi dhcpcd[382]: wlan0: carrier lost
[...]
Aug 6 08:59:26 raspberrypi dhcpcd[382]: wlan0: deleting default route via 192.168.1.1
Aug 6 08:59:26 raspberrypi dhcpcd[382]: wlan0: deleting route to 192.168.1.0/24
[...]
Aug 6 08:59:51 raspberrypi dhcpcd[382]: wlan0: carrier acquired
After Googling, I found an interesting article. Which provide interesting tips.
- Use this command to read the current power saving mode of your Pi:
$ sudo iw wlan0 get power_save
Power save: on
- And this one to turn power_save off:
$ sudo iw wlan0 set power_save off
- To make this permanent add the following line to
/etc/rc.local:
/sbin/iw dev wlan0 set power_save off
We will see if it helps :)
Update 27/10/2018
I choose to turn the power_save off as it originally was. But I came up with this script:
#!/bin/bash
#/home/pi/wap_check
# Script to monitor and restart wireless access point when needed
maxPloss=10 #Maximum percent packet loss before a restart
# Logging
# echo "$(date +"%d-%m-%y %H:%M:%S ") wap_check_pmd: Checking if network connection is down..." >> /home/pi/NetworkCheckLog
# If table 42 is empty, we lost raspberry
TABLE_42_eth0=$(ip route show table 42 | grep eth0)
TABLE_42_wlan0=$(ip route show table 42 | grep wlan0)
# addapt following "if" and TABLE_42_xxx variables above depending on your interfaces
if [[ -z "${TABLE_42_eth0}" ]] || [[ -z "${TABLE_42_wlan0}" ]]; then
# Loging
echo "$(date +"%d-%m-%y %H:%M:%S ") wap_check_pmd: Table 42 is (partialy?) empty! Trying to populate it:" >> /home/pi/NetworkCheckLog
logger "wap_check_pmd: Table 42 is (partialy?) empty! Trying to populate it."
# Purge table 42 just in case
sudo ip route flush table 42
# Filling up the table 42
ip route show table main | grep -v tun0 | while read LINE; do sudo ip route add $LINE table 42; done
sleep 1
ip route show table 42 >> /home/pi/NetworkCheckLog
fi
# IP cannot be the same, debian-transmission can go only through tun0
IP_VPN=$(sudo -u debian-transmission wget -qO- ifconfig.co)
IP_PUBLIC=$(wget -qO- ifconfig.co)
if [[ "${IP_VPN}" = "${IP_PUBLIC}" ]]; then
echo "$(date +"%d-%m-%y %H:%M:%S ") wap_check_pmd: Same IP for debian-transmission and pi: $(echo $IP_VPN) and $(echo $IP_PUBLIC)" >> /home/pi/NetworkCheckLog
logger "wap_check_pmd: Same IP for debian-transmission and pi..."
if [[ -n "${IP_PUBLIC}" ]]; then
echo "$(date +"%d-%m-%y %H:%M:%S ") wap_check_pmd: Rebooting. [1]" >> /home/pi/NetworkCheckLog
logger "wap_check_pmd: Rebooting. [1]"
sleep 1
sudo /sbin/reboot
exit
fi
fi
# Make sure we can resolve google, otherwise 'ping -w' would hang
if ! $(host -W5 www.google.com > /dev/null 2>&1); then
# Make a note in syslog
logger "wap_check_pmd: Network connection is down..."
echo "$(date +"%d-%m-%y %H:%M:%S ") wap_check_pmd: Rebooting. [2]" >> /home/pi/NetworkCheckLog
logger "wap_check_pmd: Rebooting. [2]"
# Restart device
sleep 1
sudo /sbin/reboot
exit
fi
# Initialize to a value that would force a restart
# (just in case ping gives an error and ploss doesn't get set)
ploss=101
# now ping google for 10 seconds and count packet loss
ploss=$(ping -q -w10 www.google.com | grep -o "[0-9]*%" | tr -d %) > /dev/null 2>&1
if [ "$ploss" -gt "$maxPloss" ]; then
logger "wap_check_pmd: Packet loss ($ploss%) exceeded $maxPloss"
echo "$(date +"%d-%m-%y %H:%M:%S ") wap_check_pmd: Packet loss ($ploss%) exceeded $maxPloss" >> /home/pi/NetworkCheckLog
# restart_networking
fi
I run this script every 5 minutes, line in my crontab file:
*/5 * * * * /bin/bash /home/pi/NetworkCheck.sh
Log file looks like this:
22-09-18 22:25:02 wap_check_pmd: Table 42 is empty! Trying to populate it:
22-09-18 22:26:55 wap_check_pmd: Same IP for debian-transmission and pi: and
22-09-18 22:27:09 wap_check_pmd: Rebooting. [2]
24-09-18 23:20:16 wap_check_pmd: Rebooting. [2]
25-09-18 22:26:10 wap_check_pmd: Packet loss (30%) exceeded 10
25-09-18 23:11:07 wap_check_pmd: Packet loss (16%) exceeded 10
04-10-18 02:55:12 wap_check_pmd: Packet loss (70%) exceeded 10
04-10-18 15:50:01 wap_check_pmd: Table 42 is empty! Trying to populate it:
default via 192.168.1.1 dev wlan0 src 192.168.1.200 metric 303
192.168.1.0/24 dev wlan0 proto kernel scope link src 192.168.1.200 metric 303
04-10-18 19:20:12 wap_check_pmd: Packet loss (20%) exceeded 10
04-10-18 20:40:27 wap_check_pmd: Packet loss (30%) exceeded 10
04-10-18 20:55:21 wap_check_pmd: Packet loss (16%) exceeded 10
05-10-18 20:20:01 wap_check_pmd: Table 42 is empty! Trying to populate it:
default via 192.168.1.1 dev wlan0 src 192.168.1.200 metric 303
192.168.1.0/24 dev wlan0 proto kernel scope link src 192.168.1.200 metric 303
05-10-18 20:52:25 wap_check_pmd: Packet loss (30%) exceeded 10
06-10-18 15:15:15 wap_check_pmd: Packet loss (30%) exceeded 10
07-10-18 08:55:02 wap_check_pmd: Same IP for debian-transmission and pi: and
16-10-18 19:21:53 wap_check_pmd: Same IP for debian-transmission and pi: and
16-10-18 19:22:07 wap_check_pmd: Rebooting. [2]
27-10-18 11:30:20 wap_check_pmd: Packet loss (20%) exceeded 10
youtube-dl is a usefull packet to download youtube video through command line. GitHub.
List what to download
First step is to list what youtube video you wanna download and convert to mp3 file:
2 files to put on a web server which are:
- liste.txt which must be
chmod 777 (index.php will write links in this file)
- index.php
<!DOCTYPE html>
<html>
<head>
<title>youtube-dl</title>
<meta name="viewport" content="width=device-width, initial-scale=1">
<style>
body {
width: 550px;
font-size: 75%;
}
p {
font-family: "Lucida Console", "Courier New", monospace;
white-space: nowrap
}
li {
font-family: "Lucida Console", "Courier New", monospace;
white-space: nowrap
}
hr {
border: 0;
border-bottom: 1px dashed #CCCCCC;
background: #FFFFFF;
}
input[type=text], select {
width: 80%;
padding: 12px 20px;
margin: 8px 0;
display: inline-block;
border: 1px solid #ccc;
border-radius: 4px;
box-sizing: border-box;
}
input[type=submit] {
width: 80%;
background-color: #4CAF50;
color: white;
padding: 14px 20px;
margin: 8px 0;
border: none;
border-radius: 4px;
cursor: pointer;
}
input[type=submit]:hover {
background-color: #45a049;
}
div {
border-radius: 5px;
background-color: #f2f2f2;
padding: 20px;
overflow:auto;
width: 500px;
}
</style>
</head>
<body>
<span style="white-space: nowrap">
<div>
<p>
<?php
if(isset($_POST['field1']))
{
$data = $_POST['field1'] . "\r\n";
$ret = file_put_contents('liste.txt', $data, FILE_APPEND | LOCK_EX);
if($ret === false) {
echo "There was an error writing this file.";
}
else {
echo "$ret bytes written to file.";
}
}
else {
echo "No post data to process.";
}
?>
</p>
</div>
<hr>
<div>
<p>Format to be respected:</p>
<ol>
<li>« https://www.youtube.com/watch?v=1YRW1QRKTBc »</li>
<li>« https://youtu.be/9cBtJYI6itg »</li>
<li>« https://soundcloud.com/hungry-music/nto-alter-ego »</li>
</ol>
<form action="index.php" method="POST">
<input type="text" id="fname" name="field1" placeholder="https://www.youtube.com/watch?v=1YRW1QRKTBc"><br />
<input type="submit" value="Submit">
</form>
</div>
<hr>
<div>
<p>Next link(s) to be downloaded and saved to mp3 files:</p>
<p>
<?php
echo nl2br(file_get_contents( "liste.txt" ));
?>
</p>
</div>
<hr>
<div>
<p>
Logs (last 200 lines): <br />
<?php
//echo nl2br(file_get_contents( "/path/to/history.txt" ));
echo nl2br(trim(implode("", array_slice(file("/path/to/history.txt"), -200))));
?>
</p>
</div>
</body>
</html>
Sources 1, 2
Secure input form
https://docs.nginx.com/nginx/admin-guide/security-controls/configuring-http-basic-authentication/
http://www.htaccesstools.com/htpasswd-generator/
location ^~ /youtube-dl {
auth_basic "Иди на хуй мозгоёб!!!";
auth_basic_user_file /path/to/.htpasswd;
location ~ \.php$ {
include snippets/fastcgi-php.conf;
fastcgi_pass unix:/run/php/php7.0-fpm.sock;
}
}
Restart nginx:
$ sudo service nginx restart
Download script
He depends on:
- /path/to/liste_en_cours.txt
- /path/to/history.txt
#!/usr/bin/bash
filename="$1"
liste_en_cours=/path/to/Downloads/youtube_auto/liste_en_cours.txt
cp -f $1 $liste_en_cours
sleep 1
echo -n > $1
echo " " >> /path/to/Downloads/youtube_auto/history.txt
date >> /path/to/Downloads/youtube_auto/history.txt
while read -r line
do
name="$(echo $line | sed 's/\r//g')"
echo -n "$name | " >> /path/to/Downloads/youtube_auto/history.txt
page="$(wget -O - $name)"
echo $page | sed -n 's/.*<title>\(.*\)<\/title>.*/\1/ip;T;q' >> /path/to/Downloads/youtube_auto/history.txt
/usr/local/bin/youtube-dl -f bestaudio $name --extract-audio --audio-format mp3 -o "/path/to/Downloads/youtube_auto/downloads/%(title)s.%(ext)s" | grep ffmpeg | grep mp3 | sed 's/.*\//===> /' | sed 's/mp3.*/mp3/' >> /path/to/Downloads/youtube_auto/history.txt
done < "$liste_en_cours"
mv -f /path/to/Downloads/youtube_auto/downloads/* /path/to/Music/youtube
#All big files goes to folder Mixes
for file in /path/to/Music/youtube/*; do
SIZE="$(stat --printf="%s" "$file")"
if (( $SIZE > 25000000 )); then
mv -f "$file" /path/to/Music/Mixes
fi
done
Source homemade. Now execute it with cron job by example.
Switching to yt-dlp
youtube-dl is notmaintained anymore. It now fails with "Unable to extract uploader id" error using version 2021.12.17. yt-dlp is a youtube-dl fork based on the now inactive youtube-dlc. The main focus of this project is adding new features and patches while also keeping up to date with the original project.
Use SSH to connect to Raspberry Pi. Run the following command to download the latest version of yt-dlp from GitHub repository:
$ sudo wget -qO /usr/local/bin/yt-dlp https://github.com/yt-dlp/yt-dlp/releases/latest/download/yt-dlp
Set read and execute permissions for a file:
$ sudo chmod a+rx /usr/local/bin/yt-dlp
Now yt-dlp command will be available for all users as a system-wide command.
We can check yt-dlp version as follows:
yt-dlp --version
We can update yt-dlp to the latest version by using the following command:
sudo yt-dlp -U
So in above script I replace /usr/local/bin/youtube-dl by /usr/local/bin/yt-dlp.
Source.
Stand-alone WAR installation integrated within systemd
Let's see how to install a stand-alone Airsonic on a Raspberry 3 integrated with Systemd.
First of all, we need Java to be installed:
$ sudo apt-get install openjdk-8-jre
By following these systemd setup instructions, Airsonic will be available at http://localhost:8080/airsonic.
- Setup dedicated airsonic user:
$ sudo useradd airsonic
- Setup Airsonic data dir:
$ sudo mkdir /var/airsonic
$ sudo chown airsonic /var/airsonic
- Download the stand-alone WAR:
$ sudo wget https://github.com/airsonic/airsonic/releases/download/v10.1.1/airsonic.war --output-document=/var/airsonic/airsonic.war
- Setup systemd service:
$ sudo wget https://raw.githubusercontent.com/airsonic/airsonic/master/contrib/airsonic.service -O /etc/systemd/system/airsonic.service
$ sudo systemctl daemon-reload
$ sudo systemctl start airsonic.service
$ sudo systemctl enable airsonic.service
$ sudo wget https://raw.githubusercontent.com/airsonic/airsonic/master/contrib/airsonic-systemd-env -O /etc/sysconfig/airsonic
Note: On Debian systems you need to replace /etc/sysconfig with /etc/default)
-
Go configure http://localhost:8080/airsonic.
Set up a reverse proxy: nginx
- Go edit nginx configuration:
$ sudo nano /etc/nginx/sites-available/default
-
location ^~ /airsonic {
proxy_pass http://127.0.0.1:8080;
proxy_set_header Host $host;
proxy_set_header X-Real-IP $remote_addr;
proxy_set_header X-Forwarded-For $proxy_add_x_forwarded_for;
}
- Restart nginx:
$ sudo service nginx restart
Now the Airsonic server should be accissible from outside uside http://publicadress.com/airsonic
Source 1 : Stand-alone WAR installation
Source 2 : The url I'm opening is http://publicadress.com/airsonic but it will be redirected to http://publicadress.com/login, which brings up error 404.
Set up the transcoder
$ sudo apt-get install ffmpeg
Then we need to link Airsonic with the transcoder ffmpeg.
$ sudo mkdir /var/airsonic/transcode
$ cd /var/airsonic/transcode
$ sudo ln -s /usr/bin/ffmpeg /var/aisonic/transcode/ffmpeg
$ ls -alh
total 8.0K
drwxr-xr-x 2 airsonic airsonic 4.0K Jul 22 10:54 .
drwxr-xr-x 5 airsonic tomcat8 4.0K Jul 22 10:48 ..
lrwxrwxrwx 1 root root 15 Jul 22 10:54 ffmpeg -> /usr/bin/ffmpeg
$ sudo chown -R airsonic:airsonic /var/airsonic
$ ls -alh
total 8.0K
drwxr-xr-x 2 airsonic airsonic 4.0K Jul 22 10:54 .
drwxr-xr-x 5 airsonic airsonic 4.0K Jul 22 10:48 ..
lrwxrwxrwx 1 airsonic airsonic 15 Jul 22 10:54 ffmpeg -> /usr/bin/ffmpeg
Interact with server from Android
I use the Ultrasonic application:

Source 1, 2, 3,
Startup log example
$ sudo systemctl status airsonic
● airsonic.service - Airsonic Media Server
Loaded: loaded (/etc/systemd/system/airsonic.service; enabled; vendor preset: enabled)
Active: active (running) since Tue 2022-01-18 21:09:56 CET; 20min ago
Main PID: 538 (java)
Tasks: 33 (limit: 1597)
CPU: 3min 15.474s
CGroup: /system.slice/airsonic.service
└─538 /usr/bin/java -Xmx700m -Dairsonic.home=/var/airsonic -Dserver.context-path=/airsonic -Dserver.port=8080 -jar /var/airsonic/airsonic.war
Jan 18 21:11:50 raspberrypi java[538]: 2022-01-18 21:11:50.554 INFO --- l.l.StandardLockService : Successfully released change log lock
Jan 18 21:11:51 raspberrypi java[538]: 2022-01-18 21:11:51.540 INFO --- o.a.p.service.SettingsService : Java: 1.8.0_312, OS: Linux
Jan 18 21:11:53 raspberrypi java[538]: 2022-01-18 21:11:53.290 INFO --- org.airsonic.player.Application : Detected Tomcat web server
Jan 18 21:12:31 raspberrypi java[538]: 2022-01-18 21:12:31.557 INFO --- o.a.p.service.PodcastService : Automatic Podcast update scheduled to run every 24 hour(s), starting at Tue Jan 18 21:17:31 CET 2022
Jan 18 21:12:33 raspberrypi java[538]: 2022-01-18 21:12:33.840 INFO --- o.a.p.s.search.IndexManager : Index was found (index version 18).
Jan 18 21:12:33 raspberrypi java[538]: 2022-01-18 21:12:33.900 INFO --- o.a.p.s.MediaScannerService : Automatic media library scanning scheduled to run every 1 day(s), starting at 2022-01-19T03:00:00.887
Jan 18 21:13:03 raspberrypi java[538]: 2022-01-18 21:13:03.363 INFO --- org.airsonic.player.Application : Started Application in 154.011 seconds (JVM running for 170.609)
Jan 18 21:17:31 raspberrypi java[538]: 2022-01-18 21:17:31.553 INFO --- o.a.p.service.PodcastService : Starting scheduled Podcast refresh.
Jan 18 21:17:31 raspberrypi java[538]: 2022-01-18 21:17:31.565 INFO --- o.a.p.service.PodcastService : Completed scheduled Podcast refresh.
Jan 18 21:18:01 raspberrypi java[538]: 2022-01-18 21:18:01.772 INFO --- o.a.p.f.BootstrapVerificationFilter : Servlet container: Apache Tomcat/8.5.51
$
Transmission
-
opkg update
-
opkg install transmission-daemon-openssl transmission-web luci-app-transmission
-
opkg install nano
-
nano /etc/config/transmission
-
chmod -R 777 /tmp/USB_KEY
It is necessary to make a swap file on AR150 otherwise you cannot access the web interface...
-
cd /path/where/we/will/make/swap-file
- Create a 64MB swap-file:
dd if=/dev/zero of=swap-file bs=1M count=64
-
mkswap swap-file
-
swapon swap-file
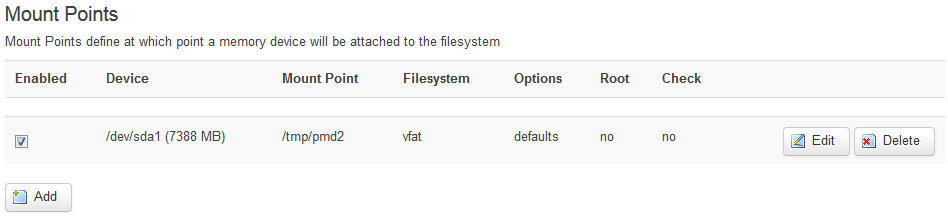
- Then go to LuCI to specify the swap file in System > Mount points to have it mounted at next router reboot.
For worldwide access add a rule in LEDE firewall:
Any tcp, udp
From any host in wan
To any router IP at port 9091 on this device
Source
Bandwidth Monitor (nlbw)
opkg install luci-app-nlbwmon
Aussi :
https://github.com/Kiougar/luci-wrtbwmon
How to upgrade GL-AR150 to Stock OpenWRT
- Connect to router using SSH
-
# cd /tmp
- Check what is the last available release for GL-AR150 here.
-
# wget http://downloads.lede-project.org/releases/17.01.4/targets/ar71xx/generic/lede-17.01.4-ar71xx-generic-gl-ar150-squashfs-sysupgrade.bin
-
# sysupgrade lede-17.01.4-ar71xx-generic-gl-ar150-squashfs-sysupgrade.bin
Source
I installed this version: LEDE Reboot (17.01.4, r3560-79f57e422d).
How to upgrade all packets
opkg list-upgradable | cut -f 1 -d ' ' | xargs opkg upgrade
Sources 1, 2
Enabling remote SSH access on LEDE/OpenWRT
Configure Dropbear
- Go to the System / Administration page.
- Under “SSH Access”, for the default “Dropbear instance”, set “Interface” to “unspecified”.
This will cause dropbear to accept connections on all interfaces.
Open port 22 (or other)
- Go to the Network / Firewall / Traffic Rules.
- Scroll down to the “Open ports on router” section.
- Enter a name for this rule, e.g. “Allow-SSH-WAN”.
- Set “Protocol” to “TCP”.
- Enter “22” as the “External Port”.
- Click “Add”.
- Click “Save and Apply”.
Source
Using USB storage devices and FAT32&NTFS filesystems
- Connect to router using SSH
-
# opkg update
-
# opkg install kmod-usb-storage
-
# opkg install usbutils
-
# lsusb -t
/: Bus 01.Port 1: Dev 1, Class=root_hub, Driver=ehci-platform/1p, 480M
|__ Port 1: Dev 2, If 0, Class=Mass Storage, Driver=usb-storage, 480M
- To add support of FAT32 and NTFS (not tested yet) usb flash/disk drives:
# opkg install kmod-fs-vfat ntfs-3g
- Then go to the LuCI administration page, System > Mount points, and configure :

Sources 1, 2, 3, 4, 5
Using the Huawei E3372 Hi-Link LTE Dongle with OpenWRT
Huawei E3372 and AR-150 have 192.168.8.1/24 IPv4 networks, change the LAN IP of AR-150.
-
# opkg update && opkg install kmod-usb-net-rndis usb-modeswitch
Of course, an internet connection is needed through Ethernet or Wifi for this step. :(
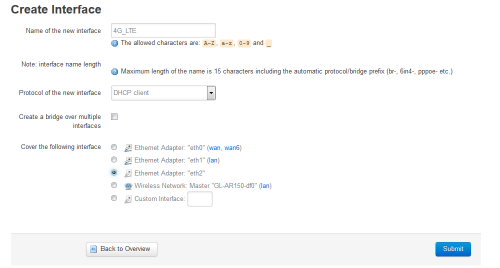
- Then go to the LuCI administration page, Network > Interfaces > Add new interface...:
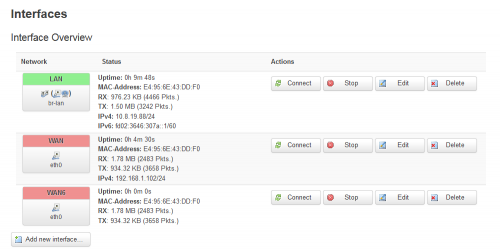
- In my case interface "eth2" is now available to configure:
- In tab Firewall Settings, add this new interface in the wan firewall-zone:
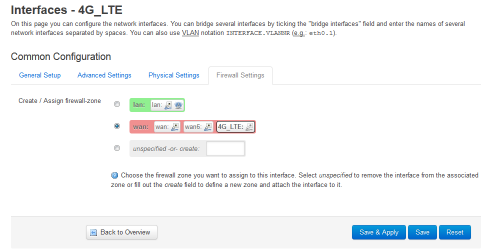
- Click on Connect of the new network 4G_LTE:
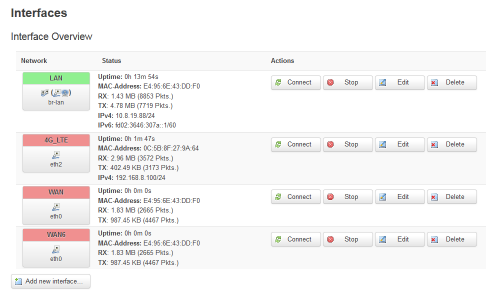
- Done, you even have access to the USB dongle administration page 192.168.8.1.
Source Nouvelle source (2020-02)
DDNS
-
# opkg install luci-app-ddns
- Go to LuCI administration interface > Services > Dynamic DNS.
- I used a Free DNS provider named freedns.afraid.org.
Source
Samba network share
-
# opkg install luci-app-samba
- Go to LuCI administration interface > Services > Network Shares.
- Add shared directories:
- Name: samba
- Path: /Path/to/mounted/usb/key
- Allowed user: empty
- Create mask: 777
- Directory mask: 777
Source
SFTP server
-
# opkg update && opkg install openssh-sftp-server
- Use Filezilla or other to connect to sftp server.
Source
Information from shellhacks.com.
Download
The following command recursively downloads your site with all its files and folders from FTP server and saves them to the current directory.
wget -r -l 0 -nH -X folder_to_skip ftp://user:pass@ftp.server.com
| option |
description |
| user |
FTP username |
| pass |
FTP password |
| ftp.server.com |
IP address or domain name of an FTP server |
| -r |
Recursive retrieving |
| -l |
Maximum recursion depth (0 = unlimit) (default = 5) |
| -nH |
Disable generation of host-prefixed directories |
| -X |
exclude a list of directories |
Backup
Now you can compress the folder with your site as follows:
tar -czf site-backup-$(date +%Y%m%d-%H%M%S).tar.gz yoursite.com
Install pluxml on raspberry pi
I am using nginx + php7 + pluxml following these 3 links:
- https://www.raspberrypi.org/documentation/remote-access/web-server/nginx.md
- https://blog.norore.fr/index.php?article13/pluxml-nginx-et-php-7-sont-dans-un-bateau
- https://docs.nginx.com/nginx/admin-guide/security-controls/configuring-http-basic-authentication/
To find which php version should be installed, you can search what is available:
$ apt-cache search php7
Install php and nginx (see here to install nginx):
$ sudo apt-get install php7.3-fpm php7.3-xml php7.3-gd
Once all is installed, configure php :
$ sudo nano /etc/php/7.3/fpm/pool.d/www.conf
[www]
user = www-data
group = www-data
listen = /run/php/php7.3-fpm.sock
listen.owner = www-data
listen.group = www-data
;listen.mode = 0660
$ sudo nano /etc/nginx/sites-available/default
server {
listen 80 default_server;
listen [::]:80 default_server;
# Add index.php to the list if you are using PHP
index index.php index.html index.htm index.nginx-debian.html;
server_name _;
location @handler {
rewrite ^/(.*)$ /index.php? last;
}
# pass PHP scripts to FastCGI server
#
location ^~ /pluxml_folder {
auth_basic "admin";
auth_basic_user_file /etc/apache2/.htpasswd;
location ~ \.php$ {
include snippets/fastcgi-php.conf;
fastcgi_pass unix:/run/php/php7.3-fpm.sock;
}
}
# deny access to .htaccess files, if Apache's document root
# concurs with nginx's one
#
location ~ /(data/configuration|version|update|\.ht) {
deny all;
}
}
Then restart both services.
Interesting problem : Nginx sucessfully password protects PHP files, but then prompts you to download them
Answer : The problem is a fundamental misunderstanding as to how nginx processes a request. Basically, nginx chooses one location to process a request.
You want nginx to process URIs that begin with /admin in a location block that requires auth_basic. In addition, URIs that end with .php need to be sent to PHP7.
So you need two fastcgi blocks, one to process normal PHP files and one to process restricted PHP files.
SSL certificate with no-ip.com
SSL Certificate Now Included with No-IP Free Dynamic DNS.
Tutorial #0: How to Configure the TrustCor Standard DV SSL
Tutorial #1: NGINX Server setup for TrustCor SSL
Generate the private key and CSR from the NGINX server by running this command:
$ sudo openssl req -nodes -days 365 -newkey rsa:2048 -keyout nginx1-trustcor.key -out nginx1-trustcor.csr
Ignoring -days; not generating a certificate
Generating a RSA private key
.....................................................+++++
.................................................................+++++
writing new private key to 'nginx1-trustcor.key'
-----
You are about to be asked to enter information that will be incorporated
into your certificate request.
What you are about to enter is what is called a Distinguished Name or a DN.
There are quite a few fields but you can leave some blank
For some fields there will be a default value,
If you enter '.', the field will be left blank.
-----
Country Name (2 letter code) [AU]:FR
State or Province Name (full name) [Some-State]:France
Locality Name (eg, city) []:none
Organization Name (eg, company) [Internet Widgits Pty Ltd]:none
Organizational Unit Name (eg, section) []:none
Common Name (e.g. server FQDN or YOUR name) []:DOMAIN_NAME.ddns.net
Email Address []:none
Please enter the following 'extra' attributes
to be sent with your certificate request
A challenge password []:
An optional company name []:none
$
Troubleshooting
Sometimes, I've had the situation where http requests from browsers are being served old versions of the PHP files, missing updates to the PHP scripts that have been uploaded to the server.
To solve this issue, I had to modify the php.ini file by setting :
opcache.enable=0
To find your php.ini location, run this php file on your server:
<?php
phpinfo();
?>
Then to reload php.ini file, restart php-fpm:
$ sudo systemctl stop php7.4-fpm
$ sudo systemctl start php7.4-fpm
$
Source 1, 2