Boot Raspberry Pi Model 3B V1.2 on SSD

Written by pmd - - no comments

I have a Raspberry Pi Model 3B V1.2. You can know your model by typing in prompt :

$ pinout
,--------------------------------.
| oooooooooooooooooooo J8     +====
| 1ooooooooooooooooooo        | USB
|                             +====
|      Pi Model 3B  V1.2         |
|      +----+                 +====
| |D|  |SoC |                 | USB
| |S|  |    |                 +====
| |I|  +----+                    |
|                   |C|     +======
|                   |S|     |   Net
| pwr        |HDMI| |I||A|  +======
`-| |--------|    |----|V|-------'

In January 2022, the microSD card got corrupted, and Pi was not reliable anymore, after about 3 years of operation.
I bought a new microSD card but as I didn't backup, I had to reinstall all over again. Not a nice feeling.

As of 23/03/2022 I am preparing to configure the Pi to boot on an SSD.

I bought two things so far:

As of 28/12/2022 I red a lot, and nothing worked, until I found something that work pretty nicely.

What I have finally setup

  1. Raspberry Pi is operationnal. Currently running based on the SD Card (FYI 32GB) inserted in the SD Card slot of the Pi.
     
  2. Using SD Card Copier already available in Raspian, I made a clone from the SD Card to the SSD:

     
  3. On your SSD, you should then have 2 partitions, one for boot and one for the OS.
    I formatted another SD Card (FYI 2GB) and I formatted it in FAT32.
    Then, I have made a copy of all the files that were in the boot partition of the SSD to this other 2GB SD Card.
     
  4. I properly switched off the Raspberry Pi.
    I removed the SD Card 32GB from the SD slot that was previously running the system.
    I inserted the SD Card 2GB which contains all the files from the boot partition of the SSD.
    I connected another USB device: a Toshiba HDD 2 TB.
    Everything is powered with the Raspberry Pi 3 Power Supply - 2.5A (Micro USB) by CanaKit. No any USB hub to power the SSD or HDD.

I am a bit concerned about the power. So I will monitor this in the coming days using two commands:

$ vcgencmd get_throttled
throttled=0x0
$ dmesg | grep -iC 3 "under-voltage"

See here for get_throttled signification.

Managing password

Written by pmd - - no comments

Why KeePass?

Today, you have to remember many passwords. You need a password for a lot of websites, your e-mail account, your webserver, network logins, etc. The list is endless. Also, you should use a different password for each account, because if you would use only one password everywhere and someone gets this password, you would have a problem: the thief would have access to all of your accounts.

KeePass is a free open source password manager, which helps you to manage your passwords in a secure way. You can store all your passwords in one database, which is locked with a master key. So you only have to remember one single master key to unlock the whole database. Database files are encrypted using the best and most secure encryption algorithms currently known (AES-256, ChaCha20 and Twofish). For more information, see the features page.

Is it really free?

Yes, KeePass is really free, and more than that: it is open source (OSI certified). You can have a look at its full source code and check whether the security features are implemented correctly.

How to

How to securely store and keep your passwords in sync on your computers and mobile devices with KeePass Password Manager
How to securely store and keep your passwords in sync on your computers and mobile devices with KeePass Password Manager (page 2)

Windows

Download KeePass and keepass-sftp-sync plugin to be able to synchronise database file through sftp protocol.

Plugin Installation and Uninstallation (source)

If there are no explicit instructions how to install the plugin, follow these steps:

  1. Download the plugin from the page above and unpack the ZIP file to a new folder.
  2. In KeePass, click 'Tools' → 'Plugins' → button 'Open Folder'; KeePass now opens a folder called 'Plugins'.
  3. Move the new folder (containing the plugin files) into the 'Plugins' folder. Restart KeePass in order to load the new plugin. To uninstall a plugin, delete the plugin files.

Starting Keepass and load Database using SFTP protocol

File > Open > Open URL...

URL example:

sftp://ftp_address.com:1234/absolute/path/to/DatabaseKeePass.kdbx

Android

Install Keepass2Android using Google Play Store.

Linux

Not needed for me so far so I don't know.


Classified in : Internet - Tags : none

Telegram bot in python

Written by pmd - - no comments

Information from Telegram itself : https://core.telegram.org/bots

YOU: /setjoingroups
BotFather: Choose a bot to change group membership settings.
YOU: @YourBot BotFather: 'Enable' - bot can be added to groups.
'Disable' - block group invitations, the bot can't be added
to groups. Current status is: DISABLED
YOU: Enable
BotFather: Success! The new status is: ENABLED.

Wireguard on Raspberry

Written by pmd - - no comments

I have tried to use Wireguard following two guides :

  1. From this forum thread, without succes: Guide: Install Wireguard On Raspberry latest releases
  2. From this blog article, without succes as well: Installing and Configuring WireGuard on Raspberry Pi OS (August 2020)

This can be used as well to generate wireguard peers configurations + QR codes: Wireguard Tools

=> no successfull handshake between server (raspberry) and peers (Android and Windows 10).

Configuration

Server:

$ sudo cat /etc/wireguard/wg0.conf
[Interface]
Address = 192.168.99.1/24
ListenPort = 58280
PrivateKey = gNVxJe7Se842IiOR5GsXeM4sHcacGhPATIdQCgqP8Wa=
PostUp = iptables -A FORWARD -i %i -j ACCEPT; iptables -A FORWARD -o %i -j ACCEPT; iptables -t nat -A POSTROUTING -o eth0 -j MASQUERADE
PostDown = iptables -D FORWARD -i %i -j ACCEPT; iptables -D FORWARD -o %i -j ACCEPT; iptables -t nat -D POSTROUTING -o eth0 -j MASQUERADE
[Peer]
PublicKey = OQmmvh9/8PDWFIpOEzVWzOZ1HXQ48+10vONFlUNb0ia=
AllowedIPs = 192.168.99.2/32
[Peer]
PublicKey = N9VPXnH8hip4sJGGWm4ziLFWD5ZAveoj7H5oH8OgsHa=
AllowedIPs = 192.168.99.3/32

Peer 1:

$ cat ~/wg_config/users/client1/client.conf
[Interface]
Address = 192.168.99.2/24
PrivateKey = 6OfJPX1ZQCFu08fTy2uU6JdgUf/qXgzBoTtX/tCYX3a=

[Peer]
PublicKey = b6kqDH4pjAdK0LqPrEF4Fc9d4XxR0Eb3kSk9rzdEKma=
AllowedIPs = 192.168.99.1/32, 192.168.1.0/24
Endpoint = adress.ddns.net:58280

Peer 2:

$ cat ~/wg_config/users/client2/client.conf
[Interface]
Address = 192.168.99.3/24
PrivateKey = uB+g5H0kbyI07kHdAajcQUE8VqMTaNqqiu0yj6BrH1a=

[Peer]
PublicKey = b6kqDH4pjAdK0LqPrEF4Fc9d4XxR0Eb3kSk9rzdEKma=
AllowedIPs = 192.168.99.1/32, 192.168.1.0/24
Endpoint = adress.ddns.net:58280


Troubleshooting

12/10/2020

UDP correctly forwarded

I verified UDP port was correctly forwarded by my ISP modem/router, following Test whether UDP port is open: simple UDP server and client

Server side:

$ nc -l -u -p 58280

Client side:

$ nc -u servname_or_ip 58280

Checking if packets arrive to server

Listening on specific interface and on precise port of the server:

$ sudo tcpdump -i eth0 'port 58280'
tcpdump: verbose output suppressed, use -v or -vv for full protocol decode
listening on eth0, link-type EN10MB (Ethernet), capture size 262144 bytes
20:56:36.474701 IP 92.88.90.88.56188 > 192.168.1.201.58280: UDP, length 148
20:56:36.476725 IP 192.168.1.201.58280 > 92.88.90.88.56188: UDP, length 92
20:57:34.066017 IP 92.88.90.88.51673 > 192.168.1.201.58280: UDP, length 148
20:57:34.070037 IP 192.168.1.201.58280 > 92.88.90.88.51673: UDP, length 92

Here I tried two times to connect a peer to the server while pinging Wireguard server IP (192.168.99.1) from peer.

17/10/2020

Recording packets using tcpdump on both client and server sides

CLIENT: in a country potentially blocking VPN stuff
SERVER: in France, probably not blocking anything

I have generated another peer configuration. This time it is not a windows, not an android, but an openwrt router using same .
I have fixed the port in use for the wireguard client on openwrt in order to listen WAN interface on 51820.

What is observed on CLIENT openwrt side:

root@OpenWrt:~# tcpdump -i eth1 'port 51820'
tcpdump: verbose output suppressed, use -v or -vv for full protocol decode
listening on eth1, link-type EN10MB (Ethernet), capture size 262144 bytes
14:37:45.906247 IP 192.168.1.102.51820 > raspberry.abo.wanadoo.fr.58280: UDP, length 148
14:37:46.025023 IP raspberry.abo.wanadoo.fr.58280 > 192.168.1.102.51820: UDP, length 92
14:37:46.038821 IP 192.168.1.102.51820 > raspberry.abo.wanadoo.fr.58280: UDP, length 32
14:38:11.087567 IP 192.168.1.102.51820 > raspberry.abo.wanadoo.fr.58280: UDP, length 32
14:38:36.687153 IP 192.168.1.102.51820 > raspberry.abo.wanadoo.fr.58280: UDP, length 32
14:39:02.286884 IP 192.168.1.102.51820 > raspberry.abo.wanadoo.fr.58280: UDP, length 32
14:39:27.887315 IP 192.168.1.102.51820 > raspberry.abo.wanadoo.fr.58280: UDP, length 32
14:39:53.487145 IP 192.168.1.102.51820 > raspberry.abo.wanadoo.fr.58280: UDP, length 32
14:39:53.498819 IP 192.168.1.102.51820 > raspberry.abo.wanadoo.fr.58280: UDP, length 148
14:39:59.257666 IP 192.168.1.102.51820 > raspberry.abo.wanadoo.fr.58280: UDP, length 148
14:40:04.377588 IP 192.168.1.102.51820 > raspberry.abo.wanadoo.fr.58280: UDP, length 148
14:40:10.138437 IP 192.168.1.102.51820 > raspberry.abo.wanadoo.fr.58280: UDP, length 148
14:40:15.257703 IP 192.168.1.102.51820 > raspberry.abo.wanadoo.fr.58280: UDP, length 148
14:40:21.017550 IP 192.168.1.102.51820 > raspberry.abo.wanadoo.fr.58280: UDP, length 148
14:40:26.782109 IP 192.168.1.102.51820 > raspberry.abo.wanadoo.fr.58280: UDP, length 148
14:40:31.897640 IP 192.168.1.102.51820 > raspberry.abo.wanadoo.fr.58280: UDP, length 148
14:40:37.659644 IP 192.168.1.102.51820 > raspberry.abo.wanadoo.fr.58280: UDP, length 148
14:40:42.777571 IP 192.168.1.102.51820 > raspberry.abo.wanadoo.fr.58280: UDP, length 148
14:40:48.537585 IP 192.168.1.102.51820 > raspberry.abo.wanadoo.fr.58280: UDP, length 148
14:40:54.298502 IP 192.168.1.102.51820 > raspberry.abo.wanadoo.fr.58280: UDP, length 148
14:41:00.057651 IP 192.168.1.102.51820 > raspberry.abo.wanadoo.fr.58280: UDP, length 148
14:41:05.177582 IP 192.168.1.102.51820 > raspberry.abo.wanadoo.fr.58280: UDP, length 148
14:41:10.937544 IP 192.168.1.102.51820 > raspberry.abo.wanadoo.fr.58280: UDP, length 148
14:41:16.697736 IP 192.168.1.102.51820 > raspberry.abo.wanadoo.fr.58280: UDP, length 148
14:41:22.457569 IP 192.168.1.102.51820 > raspberry.abo.wanadoo.fr.58280: UDP, length 148
14:41:28.220105 IP 192.168.1.102.51820 > raspberry.abo.wanadoo.fr.58280: UDP, length 148
14:41:33.977597 IP 192.168.1.102.51820 > raspberry.abo.wanadoo.fr.58280: UDP, length 148
14:41:39.097547 IP 192.168.1.102.51820 > raspberry.abo.wanadoo.fr.58280: UDP, length 148
14:42:04.697538 IP 192.168.1.102.51820 > raspberry.abo.wanadoo.fr.58280: UDP, length 148
^C
29 packets captured
29 packets received by filter
0 packets dropped by kernel
root@OpenWrt:~# wg
interface: WG0
public key: OQmmvh9/8PDWFIpOEzVWzOZ1HXQ48+10vONFlUNb0ia=
private key: (hidden)
listening port: 51820

peer: b6kqDH4pjAdK0LqPrEF4Fc9d4XxR0Eb3kSk9rzdEKma=
endpoint: raspberry.abo.wanadoo.fr:58280
allowed ips: 192.168.99.1/32
latest handshake: 32 minutes, 12 seconds ago
transfer: 92 B received, 40.80 KiB sent
persistent keepalive: every 25 seconds
root@OpenWrt:~#
  • Only first two captured packets were seen by SERVER side.
  • These two captured packets are enough to declare successful handshake on CLIENT side.

What is observed on SERVER raspberry pi side:

pi@raspberrypi:~ $ sudo tcpdump -i eth0 'port 58280'
tcpdump: verbose output suppressed, use -v or -vv for full protocol decode
listening on eth0, link-type EN10MB (Ethernet), capture size 262144 bytes
16:37:45.924082 IP 93.88.83.27.51820 > 192.168.1.201.58280: UDP, length 148
16:37:45.928019 IP 192.168.1.201.58280 > 93.88.83.27.51820: UDP, length 92
^C
2 packets captured
2 packets received by filter
0 packets dropped by kernel
pi@raspberrypi:~ $ sudo wg
interface: wg0
public key: b6kqDH4pjAdK0LqPrEF4Fc9d4XxR0Eb3kSk9rzdEKma=
private key: (hidden)
listening port: 58280

peer: OQmmvh9/8PDWFIpOEzVWzOZ1HXQ48+10vONFlUNb0ia=
endpoint: 93.88.83.27:51820
allowed ips: 192.168.99.2/32
transfer: 888 B received, 552 B sent
pi@raspberrypi:~ $
  • Only first two packets captured by CLIENT are seen as well on SERVER side.
  • Handshake is not declared successful on SERVER side.
  • Why SERVER is not seeing following packets ??? If I restart CLIENT, SERVER does not see packets for new handshake unless port used by CLIENT changes.
  • Why SERVER is not seeing anything from this CLIENT packet: " 14:37:46.038821 IP 192.168.1.102.51820 > raspberry.abo.wanadoo.fr.58280: UDP, length 32 "

Trying to connect from local country

CLIENT: in a country potentially blocking VPN stuff Computer using Windows in France, probably not blocking anything
SERVER: in France, probably not blocking anything

pi@raspberrypi:~ $ ip route show table 42
default via 192.168.1.1 dev eth0 proto dhcp src 192.168.1.201 metric 202
192.168.1.0/24 dev eth0 proto dhcp scope link src 192.168.1.201 metric 202
192.168.99.0/24 dev wg0 proto kernel scope link src 192.168.99.1
pi@raspberrypi:~ $ sudo tcpdump -i eth0 'port 58280'
tcpdump: verbose output suppressed, use -v or -vv for full protocol decode
listening on eth0, link-type EN10MB (Ethernet), capture size 262144 bytes
19:58:01.734652 IP device.mobile.abo.orange.fr.51706 > 192.168.1.201.58280: UDP, length 148  # handshake
19:58:01.741670 IP 192.168.1.201.58280 > device.mobile.abo.orange.fr.51706: UDP, length 92   # handshake
19:58:01.781909 IP device.mobile.abo.orange.fr.51706 > 192.168.1.201.58280: UDP, length 96   # ping from client
19:58:01.782398 IP 192.168.1.201.58280 > device.mobile.abo.orange.fr.51706: UDP, length 96   # server answers
19:58:02.893737 IP device.mobile.abo.orange.fr.51706 > 192.168.1.201.58280: UDP, length 96   # ping from client
19:58:02.894315 IP 192.168.1.201.58280 > device.mobile.abo.orange.fr.51706: UDP, length 96   # server answers
19:58:03.822017 IP device.mobile.abo.orange.fr.51706 > 192.168.1.201.58280: UDP, length 96   # ping from client
19:58:03.822643 IP 192.168.1.201.58280 > device.mobile.abo.orange.fr.51706: UDP, length 96   # server answers
19:58:05.793794 IP device.mobile.abo.orange.fr.51706 > 192.168.1.201.58280: UDP, length 96   # ping from client
19:58:05.794394 IP 192.168.1.201.58280 > device.mobile.abo.orange.fr.51706: UDP, length 96   # server answers
19:58:15.839250 IP device.mobile.abo.orange.fr.51706 > 192.168.1.201.58280: UDP, length 32   # ???
19:58:51.032841 IP 192.168.1.201.58280 > device.mobile.abo.orange.fr.51706: UDP, length 128  # server pings client
19:58:51.123963 IP device.mobile.abo.orange.fr.51706 > 192.168.1.201.58280: UDP, length 128  # client answers
19:58:52.033771 IP 192.168.1.201.58280 > device.mobile.abo.orange.fr.51706: UDP, length 128  # server pings client
19:58:52.090988 IP device.mobile.abo.orange.fr.51706 > 192.168.1.201.58280: UDP, length 128  # client answers
19:58:53.035792 IP 192.168.1.201.58280 > device.mobile.abo.orange.fr.51706: UDP, length 128  # server pings client
19:58:53.135887 IP device.mobile.abo.orange.fr.51706 > 192.168.1.201.58280: UDP, length 128  # client answers
19:58:54.037607 IP 192.168.1.201.58280 > device.mobile.abo.orange.fr.51706: UDP, length 128  # server pings client
19:58:54.076616 IP device.mobile.abo.orange.fr.51706 > 192.168.1.201.58280: UDP, length 128  # client answers
[...]
[...]
[...]
pi@raspberrypi:~ $ sudo wg
interface: wg0
  public key: b6kqDH4pjAdK0LqPrEF4Fc9d4XxR0Eb3kSk9rzdEKma=
  private key: (hidden)
  listening port: 58280

peer: xxMWH9tZDwCNXPbErQxBuDejgkxNU1QOm9vFezUBeSa=
  endpoint: device.mobile.abo.orange.fr :51706
  allowed ips: 192.168.99.6/32
  latest handshake: 19 seconds ago
  transfer: 564 B received, 476 B sent

=> It worked ! I conclude that wireguard is blocked in the country where the client is.

Interesting to read about how easy it is to block wireguard: Let's talk about obfuscation again


Check connectivity and switch on/off a LED (GL-AR150)

Written by pmd - - no comments

Shell script that will check if there is connectivity to a defined website every 60 seconds and switch ON/OFF the led :

  • /usr/bin/WANLED :
#!/bin/sh
while [ true ]; do
        /usr/bin/wget -q --tries=2 --spider http://google.com
        if [ $? -eq 0 ]; then
                #echo "Connected ! LED RED OFF. LED GREEN ON."
                echo "none" >  /sys/class/leds/gl-ar150:orange:wlan/trigger
                echo "default-on" >  /sys/class/leds/gl-ar150:green:wan/trigger
        else
                #echo "Not connected ! LED RED ON. LED GREEN OFF."
                echo "default-on" >  /sys/class/leds/gl-ar150:orange:wlan/trigger
                echo "none" >  /sys/class/leds/gl-ar150:green:wan/trigger
        fi
        sleep 60
done


Schell script to autostart the above script :

  • /etc/init.d/WANLED :
#!/bin/sh /etc/rc.common

START=99
STOP=1

start(){
        /usr/bin/WANLED &
}

stop(){
        killall -9 WANLED
}

Now let's make these script executable and started at startup:

# chmod +x /usr/bin/WANLED
# chmod +x /etc/init.d/WANLED
# /etc/init.d/WANLED enable
# /etc/init.d/WANLED start

Now the orange LED should be ON when there is no connectivity to Google.

FYI OpenWRT in use was : OpenWrt 19.07.2, r10947-65030d81f3

Source: LED, Start script at startup, LED on when Internet is available

Python 3.7 + Selenium on Raspberry Pi 3 and on Windows 10

Written by pmd - - no comments

Raspian buster

$ sudo apt-get install chromium-chromedriver xvfb
$ sudo python3 -m pip install pyvirtualdisplay selenium

Windows 10

Download Chrome. Install it.

https://chromedriver.chromium.org/getting-started

https://stackoverflow.com/questions/33150351/how-do-i-install-chromedriver-on-windows-10-and-run-selenium-tests-with-chrome


Python3

#!/usr/bin/python3
# -*-coding:Utf-8 -*

# Selenium
from selenium import webdriver
from selenium.webdriver.chrome.options import Options

mg = 'tck_000003X1'
options = Options()
options.add_experimental_option("prefs", {
    #"download.default_directory": default_download_directory,
    "download.prompt_for_download": False,
    "download.directory_upgrade": True,
    "safebrowsing.enabled": True,  
})
options.add_experimental_option("excludeSwitches", ["enable-logging"])

browser = webdriver.Chrome(options=options, executable_path=r'C:\Windows\chromedriver.exe')

url = "http://ms.com/ms.html?t=" + mg
browser.get(url)
etoiles = browser.find_element_by_id("etoile_span").get_attribute('class')
print("Nombre d'étoile : " + etoiles[-1])

browser.quit()

AUTO-Update of openvpn configuration

Written by pmd - - no comments

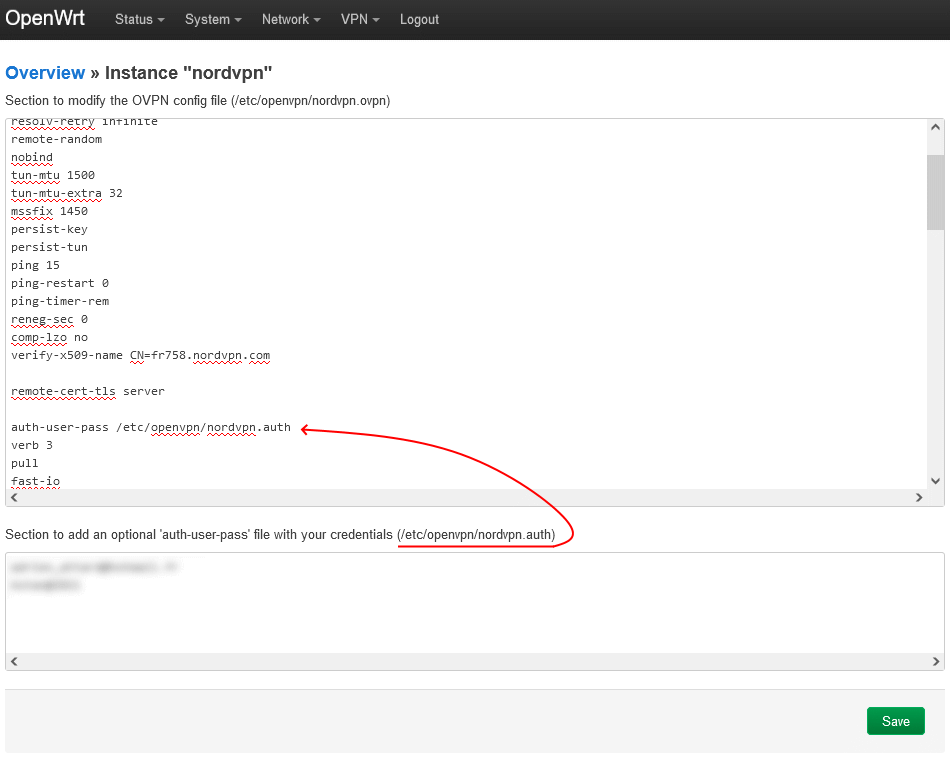
It happens that NordVPN openvpn configuration files don't work anymore after a while.

I made a bash script to update the configuration easy and fast:

#!/bin/bash
# Mise a jour de la configuration NordVPN
# Dossier temporaire
DOSSIER_TEMP="/home/pi/NordVPNautoUpdate"
#Dossier des configurations openvpn
DOSSIER_OPENVPN="/etc/openvpn"
CONF_OPENVPN="server.conf"
AUTOLOGIN_OPENVPN="login.txt"
# Pays
PAYS="ua"
# TCP ou UDP?
PROTO="udp"
# Archive de configuration NordVPN
ARCHIVE_NORDVPN="https://downloads.nordcdn.com/configs/archives/servers/ovpn.zip"
FICHIER=$(echo -n $ARCHIVE_NORDVPN | awk -F "/" '{printf $NF}')

# On supprime et on crée le dossier temp
rm -rf $DOSSIER_TEMP
mkdir $DOSSIER_TEMP

# On télécharge tous les fichiers de conf NordVPN
wget $ARCHIVE_NORDVPN -P $DOSSIER_TEMP

# On dézip l'archive téléchargée
mkdir $DOSSIER_TEMP/temp
unzip -q "$DOSSIER_TEMP/$FICHIER" -d $DOSSIER_TEMP/temp

# On garde que les conf d'un certain pays
mv $DOSSIER_TEMP/temp/ovpn_$PROTO/$PAYS[0-9]*$PROTO* $DOSSIER_TEMP/
rm -r $DOSSIER_TEMP/temp

# On supprime les conf double-VPN et l'archive zip
NbConf=0
for ConfOpenVPN in $DOSSIER_TEMP/*; do
        if [[ $ConfOpenVPN != */$PAYS[0-9]*$PROTO* ]]; then
                rm $ConfOpenVPN
        else
                # On compte le nombre de conf restantes
                NbConf=$((NbConf+1))
        fi
done

# On choisi une conf au hasard
NbConf=$((1 + RANDOM % $NbConf))
COMPTEUR=0
for ConfOpenVPN in $DOSSIER_TEMP/*; do
        COMPTEUR=$((COMPTEUR+1))
        if [[ $COMPTEUR -eq $NbConf ]]; then
            # On modifie la configuration pour authentification automatique
            sed -i "s@auth-user-pass@auth-user-pass $DOSSIER_OPENVPN/$AUTOLOGIN_OPENVPN@" $ConfOpenVPN
            # On déplace la conf dans le dossier openvpn
            sudo cp -f $ConfOpenVPN $DOSSIER_OPENVPN
            sudo cp -f $ConfOpenVPN $DOSSIER_OPENVPN/$CONF_OPENVPN
                        # On informe
                        echo "Configuration installée :"
                        echo $ConfOpenVPN | awk -F "/" '{printf $NF}'
                        echo ""
        fi
done

# On supprime le dossier temporaire
rm -rf $DOSSIER_TEMP
# On redémarre openvpn avec la nouvelle configuration
sudo service openvpn restart

Then simply execute the script:

bash NordVPNautoUpdate.sh

Unlock standalone Airsonic database

Written by pmd - - no comments

If your airsonic is stucked for some reasons such as Liquibase Update Failed and Waiting for changelog lock...

liquibase.exception.LockException: Could not acquire change log lock. Currently locked by 192.168.254.200 (192.168.254.200) since 18/11/18 16:39
  1. Stop Airsonic for sure :
    sudo service airsonic stop
  2. Read logs /var/airsonic/airsonic.log :
    nano /var/airsonic/airsonic.log
  3. Backup your database folder /var/airsonic/db :
    sudo cp /var/airsonic/db /var/airsonic/db_backup
  4. Edit /var/airsonic/db/airsonic.script :
    sudo nano /var/airsonic/db/airsonic.script
    • remove all lines where you can find DATABASECHANGELOGLOCK by example :
      • CREATE MEMORY TABLE DATABASECHANGELOGLOCK.....
      • INSERT INTO DATABASECHANGELOGLOCK VALUES(1,TRUE,'2018-11-18 16:39:56.266000000','192.168.254.200 (192.168.254.200)')
  5. Save file.
  6. Start Airsonic :
    sudo service airsonic start
  7. Check Airsonic status :
    sudo service airsonic status

If you wanna reset your Airsonic music server, just delete the database /var/airsonic/db ...

Source 1, 2, 3.

Update Airsonic on Raspberry Pi 3

Written by pmd - - no comments

How to update a standalone Airsonic

  • Stop the current running Airsonic:
$ sudo systemctl stop airsonic.service
$ cd /var/airsonic/
$ sudo mv airsonic.war airsonic.war.10.1.1.bak
$ sudo wget https://github.com/airsonic/airsonic/releases/download/v10.1.2/airsonic.war --output-document=/var/airsonic/airsonic.war
  • Put good rights to all folder (new airsonic.war is not owned by airsonic), and verify it has been applied:
$ sudo chown -R airsonic:airsonic /var/airsonic
$ ls
total 151M
-rw-r--r--  1 airsonic airsonic 760K Oct 11 19:52 airsonic.log
-rw-r--r--  1 airsonic airsonic  11M Oct  3 00:20 airsonic.log.1
-rw-r--r--  1 airsonic airsonic  978 Oct 11 04:00 airsonic.properties
-rw-r--r--  1 airsonic airsonic  70M Jul 28 22:10 airsonic.war
-rw-r--r--  1 airsonic airsonic  70M Dec 16  2017 airsonic.war.10.1.1.bak
drwxr-xr-x  2 airsonic airsonic 4.0K Oct 11 19:49 db
drwxr-xr-x  2 airsonic airsonic  20K Sep 14 16:08 lastfmcache
drwxr-xr-x  7 airsonic airsonic 4.0K Jul 22 10:36 lucene2
-rw-r--r--  1 airsonic airsonic  741 Oct 11 19:50 rollback.sql
drwxr-xr-x 16 airsonic airsonic 4.0K Oct  4 17:45 thumbs
drwxr-xr-x  2 airsonic airsonic 4.0K Jul 22 10:54 transcode
  • Start updated Airsonic and restart proxy server:
$ sudo systemctl start airsonic.service
$ sudo service nginx restart

Nothing too hard, basically, you need to replace the airsonic.war by the updated one.

PluXml 5.6 / CKEditor 4.7.3 modification to get more handy

Written by pmd - - no comments

PluXml 5.6 / CKEditor 4.7.3 modification to get handy code <div>

I modified the file /plugins/ckeditor/ckeditor/styles.js to have a much more easier way to put code in my memo.

Before:

    {
        name: 'Special Container',
        element: 'div',
        styles: {
            padding: '5px 10px',
            background: '#eee',
            border: '1px solid #ccc'
        }
    },

After:

    {
        name: 'Special Container',
        element: 'div',
        styles: {
            padding: '5px 10px',
            background: '#eee',
            border: '1px solid #ccc',
            'white-space': 'nowrap',
            'overflow': 'auto',
            'font-family': 'monospace, monospace',
            'font-size': '0.9rem'
        }
    },

Modification to get better visual when using <kbd>

In PluxXML Administration > Parameters > Themes > Edit Theme files > /css/plucss.css I have set this for <kbd> HTML tag.

kbd {
    background-color: #eee;
    border-radius: 3px;
    border: 1px solid #b4b4b4;
    box-shadow: 0 1px 1px rgba(0, 0, 0, .2), 0 2px 0 0 rgba(255, 255, 255, .7) inset;
    color: #333;
    display: inline-block;
    font-size: .85em;
    font-weight: 700;
    line-height: 1;
    padding: 2px 4px;
    white-space: nowrap;
   }
  • Before : CTRL + ALT + DEL
  • After : CTRL + ALT + DEL

CSS source

Rss feed of the category