Wireguard server on Raspberry while being an OpenVPN client

Written by pmd - - no comments

This is follwoing these first notes written a while ago : Wireguard on Raspberry

Context

The Raspberry is already an OpenVPN client : see here.

  • All packets that are not tagged '42' are using main route table (which outputs to OpenVPN tunnel).
  • All packets that are tagged '42' are using route table 42 (which outputs to internet link).

For my use case, all Wireguard packets will need to be routed as specified in table 42.

Wireguard server setup

I used this guide to globally setup wireguard and a few clients (lastest updated using iptables): Installing and Configuring WireGuard on Raspberry Pi OS (September 2021)

The generated configuration was the following:

Server:

$ sudo cat /etc/wireguard/wg0.conf
[Interface]
Address = 192.168.99.1/24
ListenPort = 58280
PrivateKey = gNVxJe7Se842IiOR5GsXeM4sHcacGhPATIdQCgqP8Wa=
PostUp = iptables -A FORWARD -i %i -j ACCEPT; iptables -A FORWARD -o %i -j ACCEPT; iptables -t nat -A POSTROUTING -o eth0 -j MASQUERADE
PostDown = iptables -D FORWARD -i %i -j ACCEPT; iptables -D FORWARD -o %i -j ACCEPT; iptables -t nat -D POSTROUTING -o eth0 -j MASQUERADE
[Peer]
PublicKey = OQmmvh9/8PDWFIpOEzVWzOZ1HXQ48+10vONFlUNb0ia=
AllowedIPs = 192.168.99.2/32

Peer 1:

$ cat ~/wg_config/users/client1/client.conf
[Interface]
Address = 192.168.99.2/24
PrivateKey = 6OfJPX1ZQCFu08fTy2uU6JdgUf/qXgzBoTtX/tCYX3a=

[Peer]
PublicKey = b6kqDH4pjAdK0LqPrEF4Fc9d4XxR0Eb3kSk9rzdEKma=
AllowedIPs = 192.168.99.1/32, 192.168.1.0/24
Endpoint = adress.ddns.net:58280

Adding other users

⚠️ ⚠️ ⚠️ Be sure to make a copy of your wireguard configuration because it will be overwritten.

$ sudo cp /etc/wireguard/wg0.conf /etc/wireguard/wg0.conf.bak  # make a backup if necessary !
$ sudo wg-quick up wg0                                         # make sure Wireguard is running
$ sudo ./wg_config/user.sh -a another_user                     # creating new user
$ ls ./wg_config/users/another_user/                           # look at all files generated
total 32K
drwxr-xr-x 2 root root 4.0K Sep 21 15:56 .
drwxr-xr-x 6 root root 4.0K Oct  9 18:16 ..
-rw-r--r-- 1 root root  216 Sep 21 15:56 client.all.conf
-rw-r--r-- 1 root root  238 Sep 21 15:56 client.conf
-rw-r--r-- 1 root root  900 Sep 21 15:56 another_user.all.png
-rw-r--r-- 1 root root 1016 Sep 21 15:56 another_user.png
-rw-r--r-- 1 root root   45 Sep 21 15:56 privatekey
-rw-r--r-- 1 root root   45 Sep 21 15:56 publickey
$

IP forwarding

For clients to be able to join each other and access internet, it is necessary to enable IP forwarding:

$ sysctl net.ipv4.ip_forward
net.ipv4.ip_forward = 0
$ sudo sysctl -w 'net.ipv4.ip_forward=1'
net.ipv4.ip_forward = 1
$ sysctl net.ipv4.ip_forward
net.ipv4.ip_forward = 1

Adjustment

Because of the context described above it wasn't enough to have a working link.

I had to add few lines for it to work on server and client sides. See below:

Server:

$ sudo cat /etc/wireguard/wg0.conf
[Interface]
Address = 192.168.99.1/24
ListenPort = 58280
PrivateKey = gNVxJe7Se842IiOR5GsXeM4sHcacGhPATIdQCgqP8Wa=
FwMark = 0x2A # if packet not tagged '42' it will be routed to tun0 interface
PostUp = iptables -A FORWARD -i %i -j ACCEPT; iptables -A FORWARD -o %i -j ACCEPT; iptables -t nat -A POSTROUTING -o eth0 -j MASQUERADE
PostUp = ip route add 192.168.99.0/24 dev wg0 proto kernel scope link src 192.168.99.1 table 42 # route table update for packet tagged '42'
PostUp = sysctl -w 'net.ipv4.ip_forward=1' # activate IP forwarding
PostUp = ip rule add from 192.168.99.0/24 table 42; ip rule add to 192.168.99.0/24 table 42 # all packet comming/leaving from 192.168.99.0/24 should use table 42

PostDown = iptables -D FORWARD -i %i -j ACCEPT; iptables -D FORWARD -o %i -j ACCEPT; iptables -t nat -D POSTROUTING -o eth0 -j MASQUERADE
PostDown = sysctl -w 'net.ipv4.ip_forward=0' # disactivate IP forwarding
PostDown = ip rule del from 192.168.99.0/24 table 42; ip rule del to 192.168.99.0/24 table 42

[Peer]
PublicKey = OQmmvh9/8PDWFIpOEzVWzOZ1HXQ48+10vONFlUNb0ia=
AllowedIPs = 192.168.99.2/32

Sources: FwMark, PostUp.

Peer 1:

$ cat ~/wg_config/users/client1/client.conf
[Interface]
Address = 192.168.99.2/24
PrivateKey = 6OfJPX1ZQCFu08fTy2uU6JdgUf/qXgzBoTtX/tCYX3a=
DNS = 208.67.222.222, 208.67.220.220

[Peer]
PublicKey = b6kqDH4pjAdK0LqPrEF4Fc9d4XxR0Eb3kSk9rzdEKma=
AllowedIPs = 0.0.0.0/0
Endpoint = adress.ddns.net:58280

Source DNS, DNS.

Start, monitor and stop wireguard

$ sudo wg-quick up wg0
[#] ip link add wg0 type wireguard
[#] wg setconf wg0 /dev/fd/63
[#] ip -4 address add 192.168.99.1/24 dev wg0
[#] ip link set mtu 1420 up dev wg0
[#] iptables -A FORWARD -i wg0 -j ACCEPT; iptables -A FORWARD -o wg0 -j ACCEPT; iptables -t nat -A POSTROUTING -o eth0 -j MASQUERADE
[#] ip route add 192.168.99.0/24 dev wg0 proto kernel scope link src 192.168.99.1 table 42
[#] sysctl -w 'net.ipv4.ip_forward=1'
net.ipv4.ip_forward = 1
[#] ip rule add from 192.168.99.0/24 table 42; ip rule add to 192.168.99.0/24 table 42
$
$ sudo wg
interface: wg0
  public key: b6kqDH4pjAdK0LqPrEF4Fc9d4XxR0Eb3kSk9rzdEKma=
  private key: (hidden)
  listening port: 58280
  fwmark: 0x2a

peer: OQmmvh9/8PDWFIpOEzVWzOZ1HXQ48+10vONFlUNb0ia=

  endpoint: 96.82.73.111:32378
  allowed ips: 192.168.99.2/32
  latest handshake: 37 seconds ago
  transfer: 425.32 KiB received, 502.92 KiB sent
$
$ sudo wg-quick down wg0
[#] ip link delete dev wg0
[#] iptables -D FORWARD -i wg0 -j ACCEPT; iptables -D FORWARD -o wg0 -j ACCEPT; iptables -t nat -D POSTROUTING -o eth0 -j MASQUERADE
[#] sysctl -w 'net.ipv4.ip_forward=0'
net.ipv4.ip_forward = 0
[#] ip rule del from 192.168.99.0/24 table 42; ip rule del to 192.168.99.0/24 table 42
$

Enabling at startup

Once everything is working you can enable Wireguard at startup by doing:

$ sudo systemctl enable wg-quick@wg0

OpenWRT on GL-AR750 + E3372 in NCM + receive SMS (2023)

Written by pmd - - no comments

⚫ Installed last available OpenWRT on AR750

login as: root
root@192.168.3.1's password:


BusyBox v1.35.0 (2023-04-27 20:28:15 UTC) built-in shell (ash)

  _______                     ________        __
 |       |.-----.-----.-----.|  |  |  |.----.|  |_
 |   -   ||  _  |  -__|     ||  |  |  ||   _||   _|
 |_______||   __|_____|__|__||________||__|  |____|
          |__| W I R E L E S S   F R E E D O M
 -----------------------------------------------------
 OpenWrt 22.03.5, r20134-5f15225c1e
 -----------------------------------------------------
root@OpenWrt:~#

Source: [OpenWrt Wiki] GL.iNet GL-AR750

⚫ Expected configuration

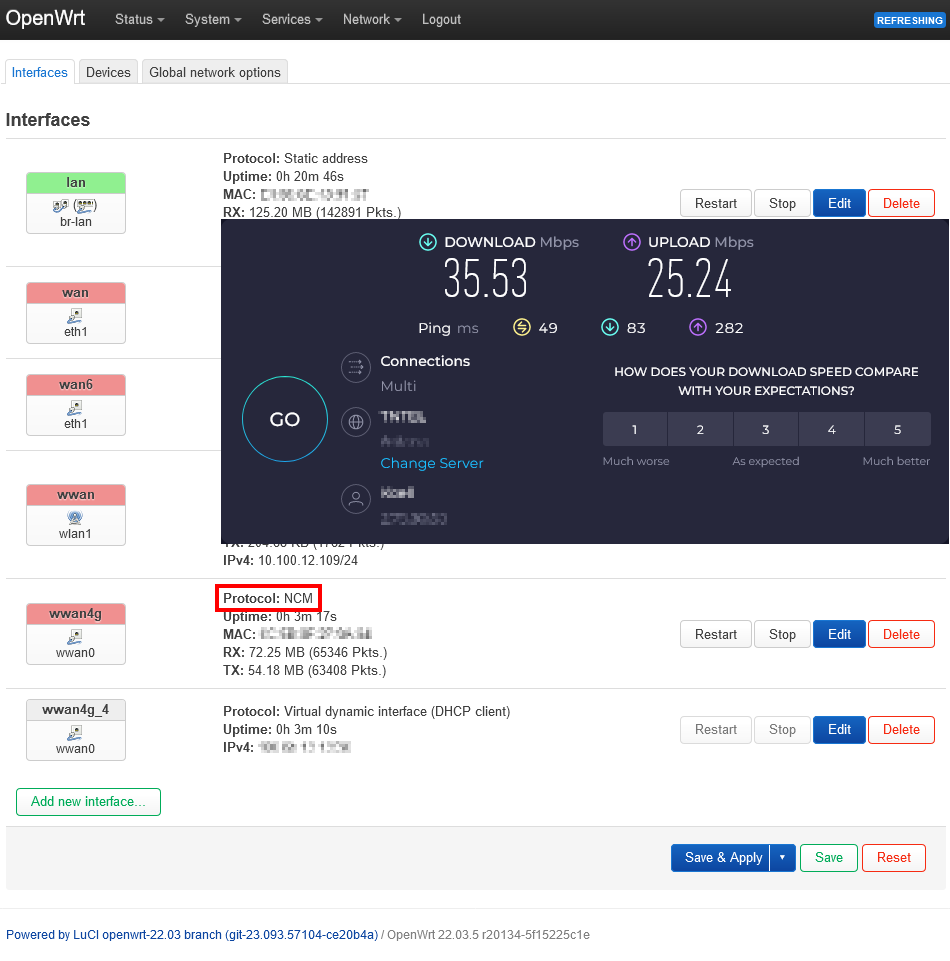
One OpenWRT router getting internet access through a 4G USB dongle using NCM connection (much faster than PPP).

⚫ Configuration

⚪ Installing necessary packets on OpenWRT

# opkg update
# opkg installkmod-usb2 kmod-usb3 kmod-usb-net-huawei-cdc-ncm comgt-ncm kmod-usb-serial kmod-usb-serial-option kmod-usb-serial-wwan luci-proto-ncm usb-modeswitch kmod-usb-serial-ipw
# opkg install nano curl socat

Sources:

  1. Installer le firmware OpenWrt sur un routeur Wi-Fi
  2. Huawei E3272 и OpenWRT: klink0v — LiveJournal

⚪ Preparing the 4G USB dongle (Huawei E3272)

I bought for cheap money an old second-hand Huawei E3272. It was loaded with a HiLink software (22.X) and SIM locked.

It took me a day of struggle to sim unlock it and finally install a working stick software (21.X).

Sources:

Finally I installed a HiLink software + WEBUI to validate good working of the 4D USB dongle on Windows 10 then installed a stick software.
All downloaded from 3ginfo.ru :

  • Huawei_E3272_Firmware_22.436.07.00.00_Universal_3Ginfo.ru.7z
  • Huawei_E3272s_WebUI_17.100.08.00.03_general_3Ginfo.ru.7z
  • Huawei_E3272s-153_Firmware_21.436.11.00.00_Universal_3Ginfo.ru.7z

All of this had to be done on a Windows 7 computer. Impossible to do on a Windows 10 computer.

⚫ Testing

⚪ Checking Huawei E3272 on OpenWRT

root@OpenWrt:~# socat - /dev/cdc-wdm0,crnl

AT

OK
AT^SYSINFOEX

^SYSINFOEX:2,3,0,1,,6,"LTE",101,"LTE"

OK
AT^SYSCFGEX=?

^SYSCFGEX: ("00","01","02","03","99"),((2000000400380,"GSM900/GSM1800/WCDMA900/WCDMA2100"),(4280000,"GSM850/GSM1900/WCDMA850"),(3fffffff,"All bands")),(0-2),(0-4),((c5,"LTE_B1/LTE_B3/LTE_B7/LTE_B8"),(7fffffffffffffff,"All bands"))

OK
ATI

Manufacturer: huawei
Model: E3272
Revision: 21.436.11.00.00
IMEI: XXXXXXXXXXXXXXX
+GCAP: +CGSM,+DS,+ES

OK
AT^FHVER

^FHVER:"E3272S-600 21.436.11.00.00,CH1E3272SM Ver.A"

OK
AT^VERSION?

^VERSION:BDT:Aug 30 2013, 12:47:28
^VERSION:EXTS:21.436.11.00.00
^VERSION:INTS:
^VERSION:EXTD:WEBUI_17.100.08.00.03_Hilink_V7R1_V3R2_V3R3
^VERSION:INTD:
^VERSION:EXTH:CH1E3272SM Ver.A
^VERSION:INTH:
^VERSION:EXTU:E3272
^VERSION:INTU:
^VERSION:CFG:1004
^VERSION:PRL:

OK
AT^SETPORT=?

^SETPORT:1: 3G MODEM
^SETPORT:2: 3G PCUI
^SETPORT:3: 3G DIAG
^SETPORT:5: 3G GPS
^SETPORT:A: BLUE TOOTH
^SETPORT:16: NCM
^SETPORT:A1: CDROM
^SETPORT:A2: SD
^SETPORT:10: 4G MODEM
^SETPORT:12: 4G PCUI
^SETPORT:13: 4G DIAG
^SETPORT:14: 4G GPS

OK
AT^SETPORT?

^SETPORT:A1,A2;10,12,16,A1,A2

OK


^Croot@OpenWrt:~#
root@OpenWrt:~#
root@OpenWrt:~#

⚪ Speed test

I made a speed test with PPP and NCM protocol to verify the common speech readable on internet:

PPP (wikipedia) NCM (wikipedia)

NCM is definitly better performing.

⚪ USSD and SMS and Telegram

To be checked and tried:

Telegram

Send a message to telegram chat:

curl -X POST -H "Content-Type:multipart/form-data" -F chat_id=<CHAT_ID> -F text="message to test !!!" "https://api.telegram.org/bot<token_from_@BotFather>/sendMessage"
curl -s -X POST -H "Content-Type:multipart/form-data" -F chat_id=<CHAT_ID> -F text="message to test !!!" "https://api.telegram.org/bot<token_from_@BotFather>/sendMessage" | jq '.ok'

Get updates from telegram chats:

curl -s https://api.telegram.org/bot<token_from_@BotFather>/getUpdates | jq
curl -s https://api.telegram.org/bot<token_from_@BotFather>/getUpdates | jq '.result[].message.text'
curl -s https://api.telegram.org/bot<token_from_@BotFather>/getUpdates | jq '.result[].message.date'

Send a message+file to telegram chat:

curl -s -X POST https://api.telegram.org/bot<token_from_@BotFather>/sendDocument -F chat_id=<CHAT_ID> -F document=@'/path/to/document' -F caption='your message here'

Receive SMS with smstools3 and forward to Telegram

opkg install kmod-usb-serial kmod-usb-serial-wwan kmod-usb-serial-option usb-modeswitch smstools3 curl iconv jq bc
mkdir /usr/local
mkdir /usr/local/bin
nano /usr/local/bin/pushsms

This file will be called as soon as a new SMS is received in order to transfer it to a Telegram chat:

#!/bin/sh
# /usr/local/bin/pushsms
# chmod +x /usr/local/bin/pushsms

chat_id=<CHAT_ID>
token=<token_from_@BotFather>

if [ "$1" == "RECEIVED" ] || [ "$1" == "REPORT" ]; then
   from=`grep "From:" $2 | awk -F ': ' '{printf $2}'`
   #sent=`grep "Sent:" $2 | awk -F ': ' '{printf $2}'`
   #received=`grep "Received:" $2 | awk -F ': ' '{printf $2}'`
   alphabet=`grep "Alphabet:" $2 | awk -F ': ' '{printf $2}'`

   if [ "$alphabet" = "UCS2" ]; then
       content=$(sed -e '1,/^$/ d' < "$2" | iconv -f UNICODEBIG -t UTF-8)
   else
       content=$(sed -e '1,/^$/ d' < "$2" | iconv -f "windows-1252" -t UTF-8)
   fi

   text=$(cat << EOF
$content
From $from
EOF
)

   curl -s -d "chat_id=$chat_id&text=$text&disable_web_page_preview=true" -X POST https://api.telegram.org/bot"$token"/sendMessage

fi

Don't forget to make above file executable.

Now editing the configuration of smstools3:

# /etc/smsd.conf
#
# Description: Main configuration file for the smsd
#

devices = GSM1
incoming = /var/spool/sms/incoming
outgoing = /var/spool/sms/outgoing
checked = /var/spool/sms/checked
failed = /var/spool/sms/failed
sent = /var/spool/sms/sent
receive_before_send = no
autosplit = 3
logfile = 1
loglevel = 5
eventhandler = /usr/local/bin/pushsms

# Uncomment (and edit) this section to allow smsd to start:
#
[GSM1]
init = AT+CPMS="ME","ME","ME"
device = /dev/cdc-wdm0
incoming = yes
#pin = 0000
baudrate = 9600
signal_quality_ber_ignore = yes
detect_unexpected_input = no
memory_start = 0
cs_convert_optical = no
report = yes

Now restart the utility:

/etc/init.d/smstools3 restart

And check logs:

logread | grep smsd

Send SMS with smstools3

sendsms 491721234567 'Hello, how are you'

Some method to send USSD code from command line

root@OpenWrt:~# socat - /dev/cdc-wdm0,crnl
AT+CUSD=1,"AA18CC3602",15

OK

^MODE: 5,4

^RSSI: 26

+CUSD: 0,"041204300448002004370430043F0440043E044100200432002004340435043B04350020003A002900200421043A043E0440043E0020043F04400438043B043504420438044200200053004D00530020043E00200432044B043F043E043B043D0435043D043804380021",72

OK
^Croot@OpenWrt:~#

Open kinda serial communication link with modem:

root@OpenWrt:~# socat - /dev/cdc-wdm0 << EOF
> AT+CUSD=1,"AA18CC3602",15
> EOF


OK

root@OpenWrt:~#
root@OpenWrt:~# cat /dev/cdc-wdm0 | grep +CUSD: > ./USSDresult.txt &
root@OpenWrt:~# echo -e -n "AT+CUSD=1,\"AA18CC3602\",15\r\n" > /dev/cdc-wdm0
root@OpenWrt:~# killall cat
[1]+ Done cat /dev/cdc-wdm0 | grep +CUSD: 1>./USSDresult.txt
root@OpenWrt:~# cat ./USSDresult.txt
+CUSD: 0,"041204300448002004370430043F0440043E044100200432002004340435043B04350020003A002900200421043A043E0440043E0020043F04400438043B043504420438044200200053004D00530020043E00200432044B043F043E043B043D0435043D043804380021",72
root@OpenWrt:~# cat ./USSDresult.txt | sed -e 's@+CUSD: 0,"@@g;s@",15@@g;s@",72@@g'
041204300448002004370430043F0440043E044100200432002004340435043B04350020003A002900200421043A043E0440043E0020043F04400438043B043504420438044200200053004D00530020043E00200432044B043F043E043B043D0435043D043804380021
root@OpenWrt:~# rm ./USSDresult.txt
root@OpenWrt:~#

To code the USSD code and decode the answer you can use this tool: SMSTools3 PDU Converter. Or these two first shell script functions below. Third function to code USSD, catch the answer and decode it:

#!/bin/sh
# Idea: https://github.com/Shumaher/huawei-ussd/blob/master/ussd.sh
# But slightly modified to make it work

decodeUCS2() # UCS2 to text (to decode USSD answer)
{
   bytes=$(echo -n $1 | sed "s/\(.\{2\}\)/\\\x\1/g")
   REPLY=$(printf $bytes | iconv -f UNICODEBIG -t UTF-8)
   echo -n "$REPLY"
}

encodePDU() # text to PDU (to code the USSD)
{
   in=$1
   let "in_len=${#in}-1"
   for chr in $(seq  0 $in_len)
   do
       let "chr2=$chr+1"
       let "t=$chr%8+1"
       if [ "$t" -ne 8 ]; then
           byte=$(printf "%d" "'${in:$chr:1}")
           let "c=$byte>>($chr%8)"
           let "c2=(1<<$t)-1"
           byte2=$(printf "%d" "'${in:$chr2:1}")
           let "b=$byte2 & $c2"
           let "c=$b<<(8-$t) | $c"
           REPLY=$REPLY$(echo "obase=16; $c" | bc | sed 's/\<[0-9A-F]\>/0&/' )
       fi
   done
       # echo "AT-command to send '$1' as USSD-request: 'AT+CUSD=1,\"$REPLY\",15"
       echo -n "$REPLY"
}

sendUSSD() # To send an USSD code to operator and get result
{
   ussd_human=$1
   ussd_pdu=$(encodePDU $ussd_human)

   rm -f ./USSDresult.txt
   cat /dev/cdc-wdm0 | grep "+CUSD: 0," > ./USSDresult.txt &
   echo -e -n "AT+CUSD=1,\"$ussd_pdu\",15\r\n" > /dev/cdc-wdm0
   # wait up to 10 seconds for the answer
   sleeptime=10
   while [ $(cat ./USSDresult.txt | grep -c "+CUSD: 0,") -le 0 ] && [ $sleeptime -ge 1 ]
   do
       sleep 1
       sleeptime=$(($sleeptime - 1))
   done
   killall cat
   # here could add an 'if' statement in case 10sec waited and answer still not catched
   REPLY=$(cat ./USSDresult.txt | sed -e 's@+CUSD: 0,"@@g;s@",15@@g;s@",72@@g' | tr -d '\r\n')
   REPLY=$(decodeUCS2 "$REPLY")
   echo -n "$REPLY"
   rm ./USSDresult.txt
}

=> sendUSSDcatchANSWER.sh

Various sources:

OpenWRT on GL-AR150 + Guest Wifi over OpenVPN (2023)

Written by pmd - - no comments

⚫ Installed last available OpenWRT on AR150

login as: xxxx
root@192.168.1.1's password:

BusyBox v1.35.0 (2023-04-27 20:28:15 UTC) built-in shell (ash)

  _______                     ________        __
 |       |.-----.-----.-----.|  |  |  |.----.|  |_
 |   -   ||  _  |  -__|     ||  |  |  ||   _||   _|
 |_______||   __|_____|__|__||________||__|  |____|
          |__| W I R E L E S S   F R E E D O M
 -----------------------------------------------------
 OpenWrt 22.03.5, r20134-5f15225c1e
 -----------------------------------------------------
#

Source: [OpenWrt Wiki] GL.iNet GL-AR150

⚫ Expected configuration

The router will get access to internet by connecting to a Wifi network available around using wlan0 interface.
The router will spread two independant Wifi network :

  1. First Wifi will connect users on br-lan interface
    br-lan users will have access to internet through wlan0
  2. Second Wifi will connect users on br-lan2 interface
    br-lan2 users will have access to internet exclusively through tun0 interface (VPN)

⚫ Configuring Guest Wifi

Source: Guest Wi-Fi using LuCI (I didn't need to touch anything in Network > Firewall > Traffic Rules)

⚫ Installing OpenVPN and set first configuration

⚪ Installing OpenVPN

# opkg update
# opkg install openvpn-openssl ip-full luci-app-openvpn

Source: OpenWrt setup with NordVPN | NordVPN support

⚪ Configuring NordVPN

Download a NordVPN configuration : Server recommended by NordVPN | NordVPN


Go to VPN > OpenVPN

Under the “OVPN configuration file upload” section name the VPN connection in the “Instance name” field (I named it “nordvpn”.) After that, click on the Browse button, locate the downloaded server file and click Upload.

In the “OpenVPN instances” section, click the Edit button next to the instance you have just created.


Illustration #01 about previous steps


In the lower field, enter your NordVPN service credential username and password into separate lines.

username
password

Now, copy the path to the credentials file that is given right above the field containing the credentials and paste it next to the “auth-user-pass” line in the “Config file” section above. It should look like this: auth-user-pass /etc/openvpn/nordvpn.auth

Click on the Save button at the bottom.


Illustration #02 about previous steps


Go to Network > Interfaces

Select the Add new interface… button and name it “nordvpntun”.
Click on the “Protocol” dropdown menu and choose “Unmanaged”.
In the “Interface” dropdown, enter the name “tun0” at the bottom -- custom -- field and press the Enter key.
Click the “Create interface” and Save buttons.


Go to Network > Firewall

Click the “Add” button and adjust it as follows:

  1. Name it “vpnfirewall”;
  2. Set the “Input” option as “Reject”;
  3. Leave “Output” as “Accept” and “Forward” as “Reject”;
  4. Check the “Masquerading” option;
  5. Check the “MSS clamping” option;
  6. From the “Covered Networks” dropdown menu choose “nordvpntun”;
  7. In the “Allow forward from source zones” dropdown menu, choose “lan”;
  8. Click the “Save” button.

In the “Zones” section, find the zone named “lan”, and click on the “Edit” button.

In the “Allow forward to destination zones” dropdown check the “nordvpntun” entry.


Go to Network > DHCP and DNS

In the “General Settings” tab, find the “DNS forwardings” option and enter DNS addresses there. Addresses could be:

  • NordVPN DNS : 103.86.96.100 and 103.86.99.100 | Source 1
  • OpenDNS : 208.67.222.222 and 208.67.220.220 | Source 1, 2
  • Google DNS : 8.8.8.8 and 8.8.4.4 | Source 1

Go to the “Resolv and Hosts Files” tab, check the “Ignore resolve file” checkbox, and click the “Save & Apply” button.

You can verify which DNS server you are actually requested data to by using ths website : DNS leak test


Go to VPN > OpenVPN

In the “OpenVPN instances” section, check the “Enable” option next to the NordVPN option in the list, and click the “Save & Apply” button.

See Illustration #01 for final setup.

Now all you internet paquets should go through the VPN link.

⚪ Creating route-up.sh to chose which paquets should go through VPN

In your OpenVPN configuration file, you need to add these both lines:

  • route-noexec
    => so OpenVPN will not modify main routing table itself
  • route-up /etc/openvpn/route-up.sh
    => so OpenVPN will execute this file where we will add some rules and routes for vpn routing table
#!/bin/sh
# /etc/openvpn/route-up.sh
# chmod +x /etc/openvpn/route-up.sh

# https://openvpn.net/community-resources/reference-manual-for-openvpn-2-4/#scripting-and-environmental-variables
# This website to know what environmental-variables are available.

# Inspiration :
# https://github.com/soehest/openvpn/blob/master/route-up.sh
# https://medium.com/@ingamedeo/openvpn-splittunneling-on-openwrt-e4302a1a4e12

echo "$dev : $ifconfig_local -> $ifconfig_remote gw: $route_vpn_gateway" | logger

# Checks to see if there is an IP routing table named 'vpn', create if missing
if [ $(cat /etc/iproute2/rt_tables | grep vpn | wc -l) -eq 0 ]; then
    echo "100     vpn" >> /etc/iproute2/rt_tables
    echo "IP routing table named 'vpn' created" | logger
fi

# Remove any previous rules in the 'vpn' routing table
#/sbin/ip rule | sed -n 's/.*\(from[ \t]*[0-9\.]*\).*vpn/\1/p' | while read RULE
/sbin/ip rule | grep vpn | sed -n 's@.*\(from[ \t]*[0-9\./]*\)@\1@p' | while read RULE
do
    echo "remove old rule:   /sbin/ip rule del ${RULE}" | logger
    /sbin/ip rule del ${RULE}
done
# Remove any previous routes in the 'vpn' routing table
echo "remove old routes: /sbin/ip route flush table vpn" | logger
/sbin/ip route flush table vpn

# Search route for traffic coming from 192.168.2.0/24 in table 'vpn'
# (unicast: This rule type simple causes the kernel to refer to the
# specified routing table in the search for a route.)
echo "adding rule:       /sbin/ip rule add from 192.168.2.0/24 table vpn" | logger
/sbin/ip rule add from 192.168.2.0/24 table vpn

# Search route for traffic going to 192.168.2.0/24 in table 'vpn'
echo "adding rule:       /sbin/ip rule add to 192.168.2.0/24 table vpn" | logger
/sbin/ip rule add to 192.168.2.0/24 table vpn

# Use 'vpn' table as default for tun0
echo "adding route:      /sbin/ip route add table vpn default dev ${dev}" | logger
/sbin/ip route add table vpn default dev ${dev}

# Route traffic from/to 192.168.2.0/24 on br-lan2 using the 'vpn'.
# table. (192.168.2.1 is the source address for outgoing packets)
echo "adding route:      /sbin/ip route add 192.168.2.0/24 dev br-lan2 proto kernel scope link src 192.168.2.1 table vpn" | logger
/sbin/ip route add 192.168.2.0/24 dev br-lan2 proto kernel scope link src 192.168.2.1 table vpn

# Logging default rules
echo "/sbin/ip rule -----------" | logger
/sbin/ip rule  | logger

# Logging default route table
echo "/sbin/ip route show -----------" | logger
/sbin/ip route show  | logger

# Logging vpn route table
echo "/sbin/ip route show table vpn ----------" | logger
/sbin/ip route show table vpn | logger

Thanks to logger, we can check what happened during execution of route-up.sh when OpenVPN connected to the server:

$ logread | tail -n 30


⚫ Updating NordVPN configuration

I made this shell script to easily update the configuration using recommended server by NordVPN :

#!/bin/sh
# chmod +x /etc/openvpn/update_conf.sh

OpenVpnConfFile='/etc/openvpn/nordvpn.ovpn'

# recuperation du serveur recommandé par NordVPN
RecommendedServer=$(curl --silent --interface tun0 'https://nordvpn.com/wp-admin/admin-ajax.php?action=servers_recommendations' | jq --raw-output '.[0].hostname' | awk -F. '{print $1}')
echo "Recommended server by NordVPN:"
echo $RecommendedServer
echo


# récupération de la configuration
echo "Trying to get server configuration https://downloads.nordcdn.com/configs/files/ovpn_udp/servers/$RecommendedServer.nordvpn.com.udp.ovpn ..."
DownloadingServerConfFile=$(curl --silent --interface tun0 --write-out "%{http_code}" -o $OpenVpnConfFile https://downloads.nordcdn.com/configs/files/ovpn_udp/servers/$RecommendedServer.nordvpn.com.udp.ovpn)
if [ $DownloadingServerConfFile -eq 200 ]
then
   echo "OK $DownloadingServerConfFile"
   echo
else
   echo "NOK $DownloadingServerConfFile"
   exit
fi


# modification de la configuration pour ajouter password + route no-exec + route-up
echo "Trying to modify $OpenVpnConfFile configuration file..."
echo "$OpenVpnConfFile before modification:"
echo "----------"
echo "[...]"
sed -n '/auth-user-pass/{p;n;p}' $OpenVpnConfFile
echo "[...]"
echo "----------"
echo "Trying to modify $OpenVpnConfFile configuration file..."
sed -i 's@auth-user-pass@auth-user-pass /etc/openvpn/nordvpn.auth\nauth-nocache\nroute-noexec\nroute-up /etc/openvpn/route-up.sh@g' $OpenVpnConfFile
echo "$OpenVpnConfFile after modification:"
echo "----------"
echo "[...]"
sed -n '/auth-user-pass/{p;n;p;n;p;n;p;n;p}' $OpenVpnConfFile
echo "[...]"
echo "----------"
echo


# redemarrage de openvpn
echo "Trying to restart OpenVPN..."
/etc/init.d/openvpn restart
sleep 1
echo -n "Waiting for tun0 interface..."
while [ $(ifconfig | grep -c tun0) == 0 ]
do
   echo -n "."
   sleep 1
done
echo
t=$(ping -c 10 -I tun0  8.8.8.8 | grep -o -E '[0-9]+ packets r' | grep -o -E '[0-9]+')
if [ $t != 0 ]; then
   echo "OK. Done."
   echo -n "Public IP: "
   curl --interface wlan0 ifconfig.co/
   echo -n "VPN IP:    "
   curl --interface tun0 ifconfig.co/
else
   echo "Something went wrong."
fi
echo
echo "Last log:"
echo "----------"
logread | tail -n 30
echo "----------"

Boot Raspberry Pi Model 3B V1.2 on SSD

Written by pmd - - no comments

I have a Raspberry Pi Model 3B V1.2. You can know your model by typing in prompt :

$ pinout
,--------------------------------.
| oooooooooooooooooooo J8     +====
| 1ooooooooooooooooooo        | USB
|                             +====
|      Pi Model 3B  V1.2         |
|      +----+                 +====
| |D|  |SoC |                 | USB
| |S|  |    |                 +====
| |I|  +----+                    |
|                   |C|     +======
|                   |S|     |   Net
| pwr        |HDMI| |I||A|  +======
`-| |--------|    |----|V|-------'

In January 2022, the microSD card got corrupted, and Pi was not reliable anymore, after about 3 years of operation.
I bought a new microSD card but as I didn't backup, I had to reinstall all over again. Not a nice feeling.

As of 23/03/2022 I am preparing to configure the Pi to boot on an SSD.

I bought two things so far:

As of 28/12/2022 I red a lot, and nothing worked, until I found something that work pretty nicely.

What I have finally setup

  1. Raspberry Pi is operationnal. Currently running based on the SD Card (FYI 32GB) inserted in the SD Card slot of the Pi.
     
  2. Using SD Card Copier already available in Raspian, I made a clone from the SD Card to the SSD:

     
  3. On your SSD, you should then have 2 partitions, one for boot and one for the OS.
    I formatted another SD Card (FYI 2GB) and I formatted it in FAT32.
    Then, I have made a copy of all the files that were in the boot partition of the SSD to this other 2GB SD Card.
     
  4. I properly switched off the Raspberry Pi.
    I removed the SD Card 32GB from the SD slot that was previously running the system.
    I inserted the SD Card 2GB which contains all the files from the boot partition of the SSD.
    I connected another USB device: a Toshiba HDD 2 TB.
    Everything is powered with the Raspberry Pi 3 Power Supply - 2.5A (Micro USB) by CanaKit. No any USB hub to power the SSD or HDD.

I am a bit concerned about the power. So I will monitor this in the coming days using two commands:

$ vcgencmd get_throttled
throttled=0x0
$ dmesg | grep -iC 3 "under-voltage"

See here for get_throttled signification.

Travaux maison

Written by pmd - - no comments

Plomberie - la base

▶️ DJ. PLOMBERIE - JE VOUS EXPLIQUE LES RACCORDS DE PLOMBERIE

Pour le tuyau de cuivre plusieurs diamètres (extérieurs): 12 - 14 - 16 - 18 - etc...

Il y a pour une maison 3 tailles de pour les raccords:

  ⌀ intérieur - extérieur (mm)
petit 3/8 12 - 17
moyenne 1/2 15 - 21
grand 3/4 20 -27

7min10sec : souvent du compteur jusqu'à la maison les plombiers mettent du PE en 25
https://www.manomano.fr/cat/tuyau+pe+25+mm

Le PE rentre dans un raccord PE 25 en entrée, puis une vanne, et en sortie un écrou 3/4.
8min35sec : Il met un mamelon male-male puis un raccord 2-pièces à écrou prisonnier 3/4 vers tuyau de cuivre 18.

9min51sec : plusieurs solutions:

  1. tuyau, des T, des coudes et on va vers les éléments
  2. une nourrisse souvent avec filletages en entrée 3/4 et sorties 1/2 (https://www.manomano.fr/cat/nourrice+plomberie)

17min15sec : toujours mettre des vannes male-femelle pour pouvoir faire une intervention dans le future.

Eléments ⌀ tube (mm) Raccord
WC 12 3/8 femelle
Bagnoire 14 - 16 (confort) 3/8 femelle
Lavabo 14 3/8 femelle
Evier 14 3/8 femelle
Douche 14 - 16 (confort) souche coudée 1/2 puis raccord exentré pour ajuster le robinet

25min25sec: au bout du tuyau pour la baignoire on veut un raccord male car les tuyaux flexibles ont un raccord femelle. Il installe une souche (d'un côté on soude, de l'autre il y a un filletage en 3/8).

Plusieurs type de tuyaux:

  1. Cuivre
  2. PER - il kiff pas
  3. Multicouche

▶️ DJ. PLOMBERIE - soudure à l'étain SUPER SIMPLE

La base de la base avec chalumeau + etain

▶️ DJ. PLOMBERIE - TOUT SUR LES SOUDURES

Pour la culture

▶️ DJ. PLOMBERIE - Raccordement d'un radiateur en fonte TOUT EN CUIVRE

05min00: cintrage tuyau cuivre (commentaire : "sans le recuire du coup il frise")
15min10: ébavureur pour éviter les pertes de charge de l'eau qui passe dans les tuyaux.
16min40: machine à sertir cuivre-cuivre !
17min23: étanchéité à la filasse (avec grifure du pas de vis pour que la fillasse ne tourne pas) + pâte à joint


▶️ Loic Le Jardineur - Chauffage solaire et poêle bouilleur la combinaison gagnante

Isolation - Chauffage

▶️ Comme un pingouin dans le désert - Comment choisir LE MEILLEUR chauffage électrique ?

▶️ Comme un pingouin dans le désert - Quel est LE MEILLEUR ISOLANT pour faire un maximum d'économies ?

Plancher bois

▶️ Comme un pingouin dans le désert - Comment rénover un plancher d'étage mal dimensionné ? - LMKF #3

Classified in : Uncategorized - Tags : none

Create Your Own Hedge Fund: Increase Profits and Reduce Risk with ETFs and Options

Written by pmd - - no comments

Mes notes sur ce livre.

🔴 PART I: OUTPERFORMING THE MARKET
🟡 PART II: EHCHANGE TRADED FUNDS
🟢 PART III: OPTIONS
🔵 PART IV: PUTTING IT ALL TOGETHER


PART I: OUTPERFORMING THE MARKET


🔴 CHAPTER 1 Modern Portfolio Theory

On investit en bourse pour en tirer en retour sur investissement convenable.

🔴 CHAPTER 2 Can You Beat the Market? Should You Try?

Beaucoup de monde pense pouvoir battre le marché. Mais c'est déjà quasi impossible de faire la même performance que le marché.

🔴 CHAPTER 3 Hedge Funds


PART II: EHCHANGE TRADED FUNDS


🟡 CHAPTER 4 A Brief History of Mutual Funds and Exchange Traded Funds

🟡 CHAPTER 5 Traditional Mutual Funds

🟡 CHAPTER 6 Exchange Traded Funds


PART III: OPTIONS


🟢 CHAPTER 7 What Is an Option and How Does an Option Work?

🟢 CHAPTER 8 More Options Basics

🟢 CHAPTER 9 Why Investors Buy and Sell Options

🟢 CHAPTER 10 Option Strategies You Can Use to Make Money: Covered Call Writing

🟢 CHAPTER 11 Option Strategies You Can Use to Make Money: Uncovered Put Writing

🟢 CHAPTER 12 Historical Data: BuyWrite Index and Volatility Index


PART IV: PUTTING IT ALL TOGETHER


🔵 CHAPTER 13 Building a Portfolio

🔵 CHAPTER 14 Finding Your Style: Choosing an Option to Write

🔵 CHAPTER 15 Covered Call Writing in Action: A Year of Trading

Dans ce chapitre l'auteur trade pendant 1 an à base de vente de CALL couvert sur quelques ETF. Il explique que c'est possible de faire la même chose plus efficacement en vendant des PUT nus. Il se met en situation de vente de CALL couvert car beaucoup de broker n'autorise pas leurs client à vendre des PUTS.

Rouler une position type I: rouler une position pour se protéger

Rouler une position type II: rouler une position pour faire de l'argent

🔵 CHAPTER 16 Uncovered Put Writing in Action

Dans ce chapitre il se met en situation pendant quelques mois mais cette fois-ci en vendant des PUT principalement.
Si assigné sur une vente de PUT, il vendra alors un CALL couvert le mois prochain.

Entre la vente de PUT NAKED (avec du cash dispo si assignation) et la vente de CALL COUVERT, aucune des deux positions n'est plus risquée.

Plus interressant le PUT, car une seul opération donc moins de frais: vendre un PUT. Et aussi facile de prendre une plus-value, une seule opération: racheter le PUT.

JUNE EXPIRATION
Il vends des PUT qui sont à peine ITM (STRIKE > prix du sous-jacent).

🔵 CHAPTER 17 Odds and Ends and Conclusion

Rouler une position type III: rouler pour éviter de se faire assigner

Rouler une position type IV: rouler pour encaisser un premium allechant

Classified in : Options - Tags : none

Drag'n'drop to compress video using ffmpeg

Written by pmd - - no comments

1. Download ffmpeg

Link to download ffmpeg: https://github.com/BtbN/FFmpeg-Builds/releases

2. Create a *.bat file

@ECHO OFF
SETLOCAL ENABLEDELAYEDEXPANSION
FOR %%A IN (%*) DO (
    ECHO %%A
    SET input=%%A
    ECHO !input!
    SET "output=!input!.compressed.mp4"
    ECHO !output!
    "C:\path\to\ffmpeg-master-latest-win64-gpl\bin\ffmpeg" -y -i !input! -vcodec h264 -acodec mp3 !output!
)
pause
RET  OTHER THING YOU COULD PUT IN THE COMMAND LINE:
RET  ----------------------------------------------
RET  TO CHANGE OUTPUT RESOLUTION =>   -s "640x360"
RET  TO KEEP ONLY SOME TIME      =>   -ss 00:01:00 -to 00:02:00

Discussion about ffmpeg command line to use: Compress mp4 using FFMPEG · GitHub

Setting a variable into a for loop (batch)

3. Create a shortcut on Desktop and drag'n'drop

It will create a new file in same path than the video you want to compress with following name: "original_file_name.extension.compressed.mp4".
You can drag'n'drop several files.


AutoHotkey scripts for keyboard shortcuts

Written by pmd - - no comments

How do I put my hotkeys and hotstrings into effect automatically every time I start my PC?

There are several ways to make a script (or any program) launch automatically every time you start your PC. The easiest is to place a shortcut to the script in the Startup folder:

  1. Find the script file, select it, and press Ctrl + C.
  2. Press Win + R to open the Run dialog, then enter shell:startup and click OK or Enter. This will open the Startup folder for the current user. To instead open the folder for all users, enter shell:common startup (however, in that case you must be an administrator to proceed).
  3. Right click inside the window, and click "Paste Shortcut". The shortcut to the script should now be in the Startup folder.

Source

Activate a AutoHotkey script

Double-click to run *.ahk script. It will show up in the notification area.

Script #1: Insert Date in Any Program Using Keyboard Hotkey

^!d::                                               ; CTRL + ALT + D
    KeyWait, d                                      ; wait for d to be released
    KeyWait, d, D T0.2                              ; and pressed again within 0.2 seconds
    If ErrorLevel {                                 ; if timed-out (only a single press)
        FormatTime, CurrentDateTime,, yyyy_MM_dd_
        SendInput, %CurrentDateTime%
    }
    Else {                                          ; if not timed-out (double press)
        FormatTime, CurrentDateTime,, dd/MM/yyyy
        SendInput, %CurrentDateTime%
    }
return

Press Ctrl + Alt + D and it will print a date in this format: « 2022_01_14_ »
Press Ctrl + Alt + D + D and it will print a date in this format: « 14/01/2022 »

Source + FormatTime - Syntax & Usage | AutoHotkey

Script #2: Cursor Highlighter

Source


Classified in : Office - Tags : none

Fixing my Logitech Z-5450 rear left wifi speaker

Written by pmd - - no comments

Symptoms

  • No sound from rear speaker
  • Control center is flashing green (trying to connect)
  • Faulty rear speaker led is flashing red immediately after plugging in the power (indicates error)
  • OR led totally off

Solutions from internet

Youtube - Logitech Z-5450 Rear Wifi Speaker Cap replacement - 2.0

I have a LogitechSpeaker System Model Z5450 the speakers will...

Repairing the Logitech Z-5450 5.1 THX Surround Sound system

Logitech Z-5450 5.1 surround sound speakers - no sound from rear right only

Trying to fix the rear left wifi speaker

I followed the Youtube video, first link in solutions from internet.

A - Dismounting supposed faulty parts

B - Mounting new parts

After replacing supposed faulty parts

It works again all good.
Fixed red led when no communication with base.
Fixed blue led when base is switched on.
And sound in the speaker.

Edit 24/12/2023: I fixed the rear right speaker the same way.

Managing password

Written by pmd - - no comments

Why KeePass?

Today, you have to remember many passwords. You need a password for a lot of websites, your e-mail account, your webserver, network logins, etc. The list is endless. Also, you should use a different password for each account, because if you would use only one password everywhere and someone gets this password, you would have a problem: the thief would have access to all of your accounts.

KeePass is a free open source password manager, which helps you to manage your passwords in a secure way. You can store all your passwords in one database, which is locked with a master key. So you only have to remember one single master key to unlock the whole database. Database files are encrypted using the best and most secure encryption algorithms currently known (AES-256, ChaCha20 and Twofish). For more information, see the features page.

Is it really free?

Yes, KeePass is really free, and more than that: it is open source (OSI certified). You can have a look at its full source code and check whether the security features are implemented correctly.

How to

How to securely store and keep your passwords in sync on your computers and mobile devices with KeePass Password Manager
How to securely store and keep your passwords in sync on your computers and mobile devices with KeePass Password Manager (page 2)

Windows

Download KeePass and keepass-sftp-sync plugin to be able to synchronise database file through sftp protocol.

Plugin Installation and Uninstallation (source)

If there are no explicit instructions how to install the plugin, follow these steps:

  1. Download the plugin from the page above and unpack the ZIP file to a new folder.
  2. In KeePass, click 'Tools' → 'Plugins' → button 'Open Folder'; KeePass now opens a folder called 'Plugins'.
  3. Move the new folder (containing the plugin files) into the 'Plugins' folder. Restart KeePass in order to load the new plugin. To uninstall a plugin, delete the plugin files.

Starting Keepass and load Database using SFTP protocol

File > Open > Open URL...

URL example:

sftp://ftp_address.com:1234/absolute/path/to/DatabaseKeePass.kdbx

Android

Install Keepass2Android using Google Play Store.

Linux

Not needed for me so far so I don't know.


Classified in : Internet - Tags : none
Rss feed of the articles